WMS Inbound - Two Step - Receive Goods in Input and Then Stock
- When "Two Step - Receive Goods in Input and Then Stock" is enabled in the inventory defaults of the sBizzl app settings, the interface facilitates a two-step process for receiving goods.
- In the Two Step process, there are three statuses: "Notified" ,”Received” and "Completed," simplifying tracking and management.
- Learn how to select inbound.
- Below display "Start Receiving" screen.
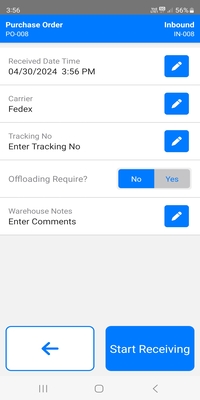
- Clicking on the Receive date time field opens a modal where users can select the receive date and time.
- Clicking on the Carrier field opens a modal where users can select the carrier for the shipment.
- The Tracking No. field opens a modal, allowing users to manually input or scan tracking numbers using barcodes.
- Users are prompted to specify whether offloading is necessary by selecting either "Yes" or "No."
- If "Yes" is selected, open the offloading required modal.
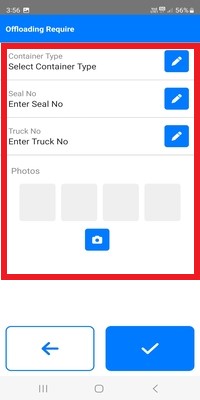
- When clicking on the Container type, a modal opens allowing users to select from available options or manually enter container type.
- Clicking on the Seal No field opens a modal, enabling users to manually input the seal number or scan it via the device camera.
- When users click on the Truck No field, a modal appears, allowing them to manually input the truck number or scan it using the device camera.
- Users can click on the photo icon to capture any necessary images related to the inbound process, facilitating documentation and record-keeping within the WMS app.
- Clicking on the ✔ button, displays details regarding whether offloading is required.
- By clicking on the Warehouse note, a modal opens allowing the user to input any relevant information or notes pertaining to the warehouse.
- Clicking on the ✔ button, navigates to the Add Warehouse Location screen.
- Below display the Add Warehouse Location screen.
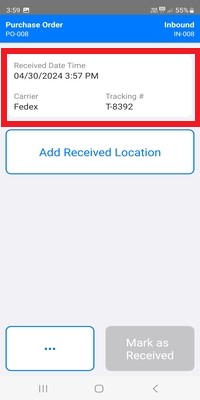
- The above displayed receiving details include the receiving date and time, carrier information, tracking number, and warehouse notes. Additionally, container type, seal number, truck number, and photos are also shown.
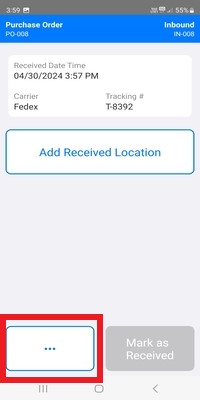
- Clicking the ••• button allows users to access and edit the information related to receiving.
- By clicking "Add Warehouse Location," users can conveniently add a new location to the warehouse management system.
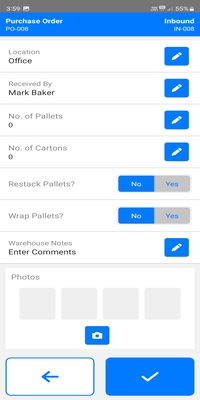
- The Location field opens a modal where users can either select the location or scan it using the device camera.
- Clicking on the Received by field opens a modal where users can search and select the employee name.
- Click on the No of Pallets, opens a modal where users can enter the number of pallets required.
- Clicking on No of Cartoons, opens a modal where users can input the number of cartoons needed.
- Users can select "Yes" or "No" to indicate whether pallets need restacking when handling inbound products.
- If users select "Yes", a modal will appear prompting them to specify the number of pallets restacked and enter the restacking time.
- Below display the Restack Pallets modal.
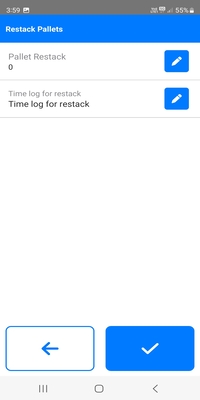
- The Pallet restack field allows users to input the number of pallets that were restacked during the receiving process.
- The Time log for restack field enables users to enter the time log for the restacking of pallets, providing a record of when this activity occurred.
- Clicking on the ✔ button to saves the entered value and closes the modal, ensuring that the changes are applied.
If users choose "Yes," they indicate that pallets need wrapping; if "No," they indicate no wrapping is required.
- When selecting Yes for wrapping pallets, a modal opens for users to input the number of wrapped pallets and add a timelog for wrapping each pallet.
- The warehouse note field allows users to add specific instructions, remarks, or any relevant information related to the warehouse operation or the received products.
By clicking on the "Photos" icon, users can upload images of the warehouse location, providing visual documentation and aiding in inventory management and record-keeping processes.
- Clicking on the X button clears all entered data and navigates back, facilitating a quick reset of the interface.
- Clicking on the ✔ button, saves the information entered and navigates back to the previous screen automatically.
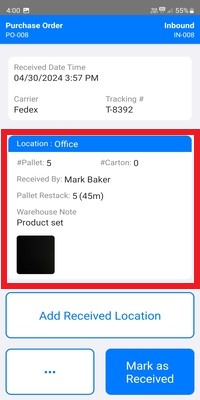
- The warehouse location detail showcases essential information such as location name, pallet and cartoon counts, recipient name, restack and wrap pallet details, warehouse notes, and location photos.
- Users can conveniently add multiple warehouse locations using the "Add Warehouse Location" feature in the application.
- By clicking on a specific warehouse location, users can easily edit the details of that particular warehouse.
- Once the user clicks "Mark as Received," the received details and location details become uneditable.
- Navigate to the Mark as Completed screen.

- Selecting the product card allows users to input and add the quantity received for that specific product item in the inventory.
- If the received quantity is less than the notified quantity, the received quantity will be displayed in red color.
- After Clicking on Mark as Completed, If all the quantity is not received, a prompt appears asking the user whether to create a backorder for the non-received quantity.
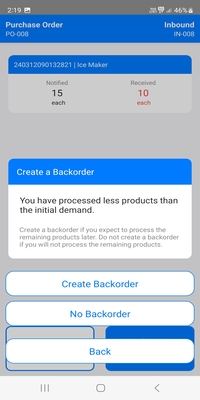
- Users have the option to choose whether to create a backorder or not for the non-received quantity.
- This two-step process streamlines the receipt and stocking of goods, enhancing efficiency and accuracy in inventory management.
- Mandatory fields ensure accurate recording of receiving and stocking details.
- Automated backorder creation ensures visibility of outstanding quantities, enabling proactive management of inventory.
- The user-friendly interface enhances user experience and productivity.
- Overall, the "Two Step - Receive Goods in Input and Then Stock" feature optimizes the inbound inventory management process within the sBizzl WMS app.