WMS Inbound - Three Step - Receive Goods in Input, Then Quality, and Then Stock
- When "Three Step - Receive Goods in Input, Then Quality, and Then Stock" is chosen in the inventory defaults of the sBizzl app settings, it introduces a comprehensive three-step process for managing incoming inventory.
- In the Two Step process, there are three statuses: "Notified," ”Received,” ”Checked” and "Completed," simplifying tracking and management.
Learn how to select inbound.
- Below display "Start Receiving" screen.
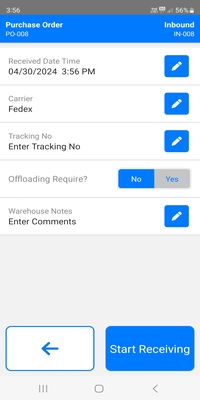
- Clicking on the Receive date time field opens a modal where users can select the receive date and time.
- Clicking on the Carrier field opens a modal where users can select the carrier for the shipment.
- The Tracking No. field opens a modal, allowing users to manually input or scan tracking numbers using barcodes.
- Users are prompted to specify whether offloading is necessary by selecting either "Yes" or "No."
- If "Yes" is selected, open the offloading required modal.
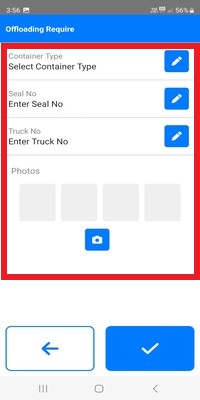
- When clicking on the Container type, a modal opens allowing users to select from available options or manually enter container type.
- Clicking on the Seal No field opens a modal, enabling users to manually input the seal number or scan it via the device camera.
- When users click on the Truck No field, a modal appears, allowing them to manually input the truck number or scan it using the device camera.
- Users can click on the photo icon to capture any necessary images related to the inbound process, facilitating documentation and record-keeping within the WMS app.
- Clicking on the ✔ button, displays details regarding whether offloading is required.
- By clicking on the Warehouse note, a modal opens allowing the user to input any relevant information or notes pertaining to the warehouse.
- Clicking on the ✔ button, navigates to the Add Warehouse Location screen.
- Below display the Add Warehouse Location screen.
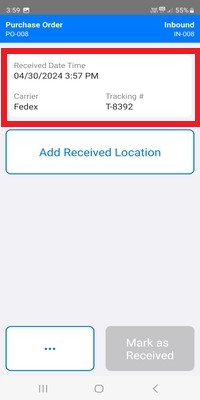
- The above displayed receiving details include the receiving date and time, carrier information, tracking number, and warehouse notes. Additionally, container type, seal number, truck number, and photos are also shown.
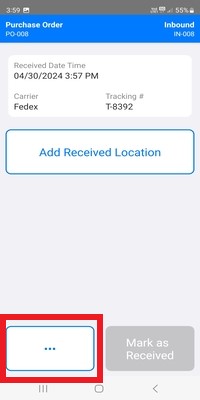
- Clicking the ••• button allows users to access and edit the information related to receiving.
- By clicking "Add Warehouse Location," users can conveniently add a new location to the warehouse management system.
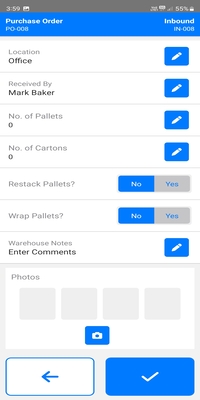
- The Location field opens a modal where users can either select the location or scan it using the device camera.
- Clicking on the Received by field opens a modal where users can search and select the employee name.
- Click on the No of Pallets, opens a modal where users can enter the number of pallets required.
- Clicking on No of Cartoons, opens a modal where users can input the number of cartoons needed.
- Users can select "Yes" or "No" to indicate whether pallets need restacking when handling inbound products.
- If users select "Yes", a modal will appear prompting them to specify the number of pallets restacked and enter the restacking time.
- Below display the Restack Pallets modal.
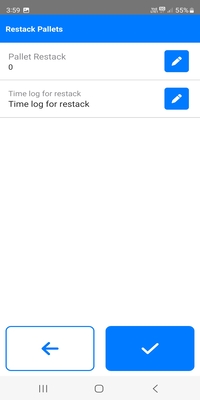
- The Pallet restack field allows users to input the number of pallets that were restacked during the receiving process.
- The Time log for restack field enables users to enter the time log for the restacking of pallets, providing a record of when this activity occurred.
- Clicking on the ✔ button to saves the entered value and closes the modal, ensuring that the changes are applied.
- If users choose "Yes," they indicate that pallets need wrapping; if "No," they indicate no wrapping is required.
- When selecting Yes for wrapping pallets, a modal opens for users to input the number of wrapped pallets and add a timelog for wrapping each pallet.
- The warehouse note field allows users to add specific instructions, remarks, or any relevant information related to the warehouse operation or the received products.
- By clicking on the "Photos" icon, users can upload images of the warehouse location, providing visual documentation and aiding in inventory management and record-keeping processes.
- Clicking on the X button clears all entered data and navigates back, facilitating a quick reset of the interface.
- Clicking on the ✔ button, saves the information entered and navigates back to the previous screen automatically.
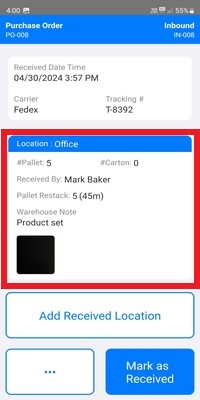
- The warehouse location detail showcases essential information such as location name, pallet and cartoon counts, recipient name, restack and wrap pallet details, warehouse notes, and location photos.
- Users can conveniently add multiple warehouse locations using the "Add Warehouse Location" feature in the application.
- By clicking on a specific warehouse location, users can easily edit the details of that particular warehouse.
- Once the user clicks "Mark as Received," the received details and location details become uneditable.
- Clicking "Mark as Received" updates the inbound status from "Notified" to "Received" and automatically redirects to the Product Checking screen for further processing and verification.
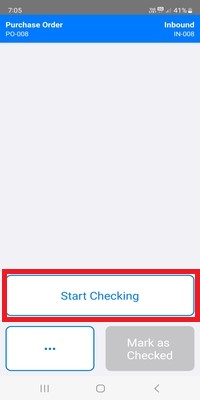
- Below display Product Checking screen.
- Clicking the ••• button allows users to access to view receiving information.
- By clicking "Start Checking," users initiate the product checking process and are directed to the product selection screen for further action.
- Below display the Product Selection screen.
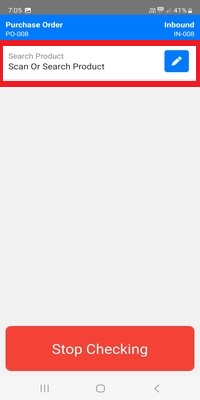
- Clicking "Scan or Search Product" prompts a modal to open, allowing users to either scan or manually search for products.
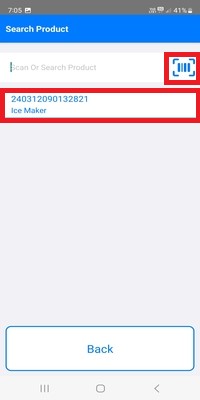
- Users have the option to search and select products from a list or scan product barcodes, facilitating automatic navigation to the product detail checking screen.
- Below display the Product Detail Checking screen.
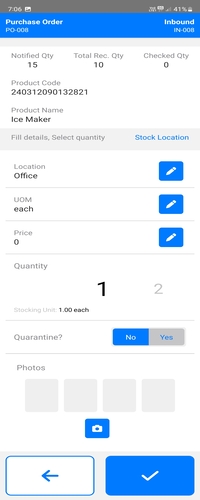
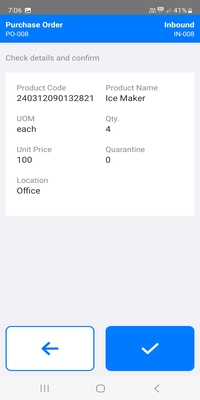
- The upper card provides details such as received quantity, total received quantity, checked quantity, product name, and product code for easy reference and management.
- Users have the option to specify the product's location, unit of measurement (UOM), price, quantity, and even add product photos for comprehensive record-keeping and management.
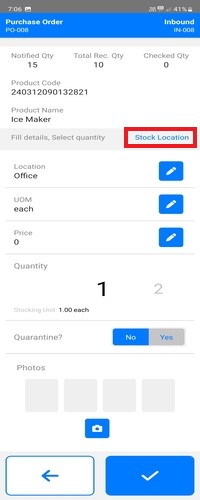
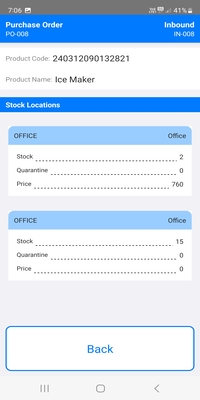
- When clicking on "Stock Location," detailed information regarding the stock location will be displayed for user reference.
- Click on Back button to navigate the back screen.
- Clicking on the ✔ button, saves the entered information and redirects the user to the product checking detail screen.
- Click the ← button to edit product checking values, then click the ✔ button to save the changes and automatically the navigate product selection screen to check other products.
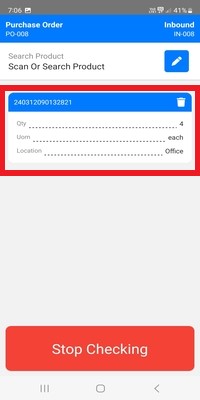
- The card above shows the product code, quantity, units, and location for easy reference and management.
- Click on the 🗑️ icon to remove the checked product from the list and delete its associated information.
- Click on "Scan or Search Product" to explore and verify additional products in the checking process.
- After concluding the checking process, select Stop Checking to specify the number of boxes or pallets verified.

- Users can input the number of boxes or pallets checked during the verification process.
- Click on Confirm button, navigate to the Mark as Checked screen.
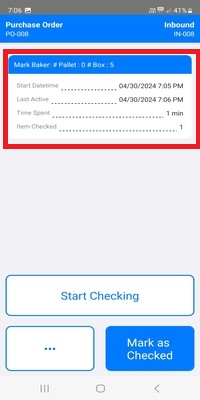
- The "Mark as Checked" screen showcases product checking details like start date and time, last active time, time spent, and the checked item.
- Clicking "Mark as Checked" initiates the finalization process.
- Clicking the "Mark as Checked" button signifies the end of product checking, leading users to the "Mark as Completed" screen automatically.
- By clicking the ••• button, users can access detailed information about product receiving and checking, aiding in comprehensive inventory management and quality control.
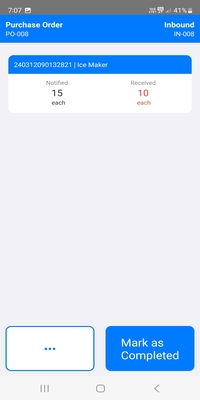
- Selecting the product card allows users to input and add the quantity received for that specific product item in the inventory.
- If the received quantity is less than the notified quantity, the received quantity will be displayed in red color.
- After Clicking on Mark as Completed, If all the quantity is not received, a prompt appears asking the user whether to create a backorder for the non-received quantity.
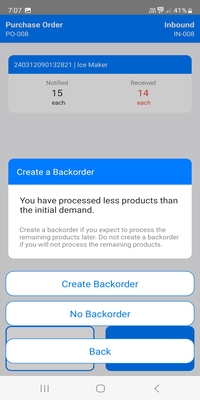
- Users have the option to choose whether to create a backorder or not for the non-received quantity.
- This three-step process streamlines inventory management, ensuring accuracy and efficiency in receiving, quality control, and stocking processes.
- Mandatory fields ensure comprehensive recording of receiving, quality, and stocking details.
- Optional fields provide flexibility based on specific requirements or preferences.
- Automated backorder creation enhances the visibility of outstanding quantities, facilitating proactive inventory management.
- The user-friendly interface enhances productivity and user experience.
- Overall, the "Three Step - Receive Goods in Input, Then Quality, and Then Stock" feature optimizes inventory management within the sBizzl WMS app, catering to diverse business needs.
Learn more about One-Step - Received Goods Directly or Two-Step - Receive Goods in Input and Then Stock