Time adjust
Keeping track of employee work hours is essential for payroll accuracy and adherence to labor laws. However, situations arise where employees might need to adjust their recorded times. This is where the clocking time adjustment process comes in.
To access the time adjust screen, navigate to Time > Time Adjust.
Also, you can navigate to Time > Clockings > Clocking detail screen that provides information about your clocking data for a specific date. Within this Clocking detail screen, you can find a Time Adjust button located before the total worked and break time. Clicking this button would launch the time adjustment screen.
Employees must have appropriate permission to access the time adjust screen.

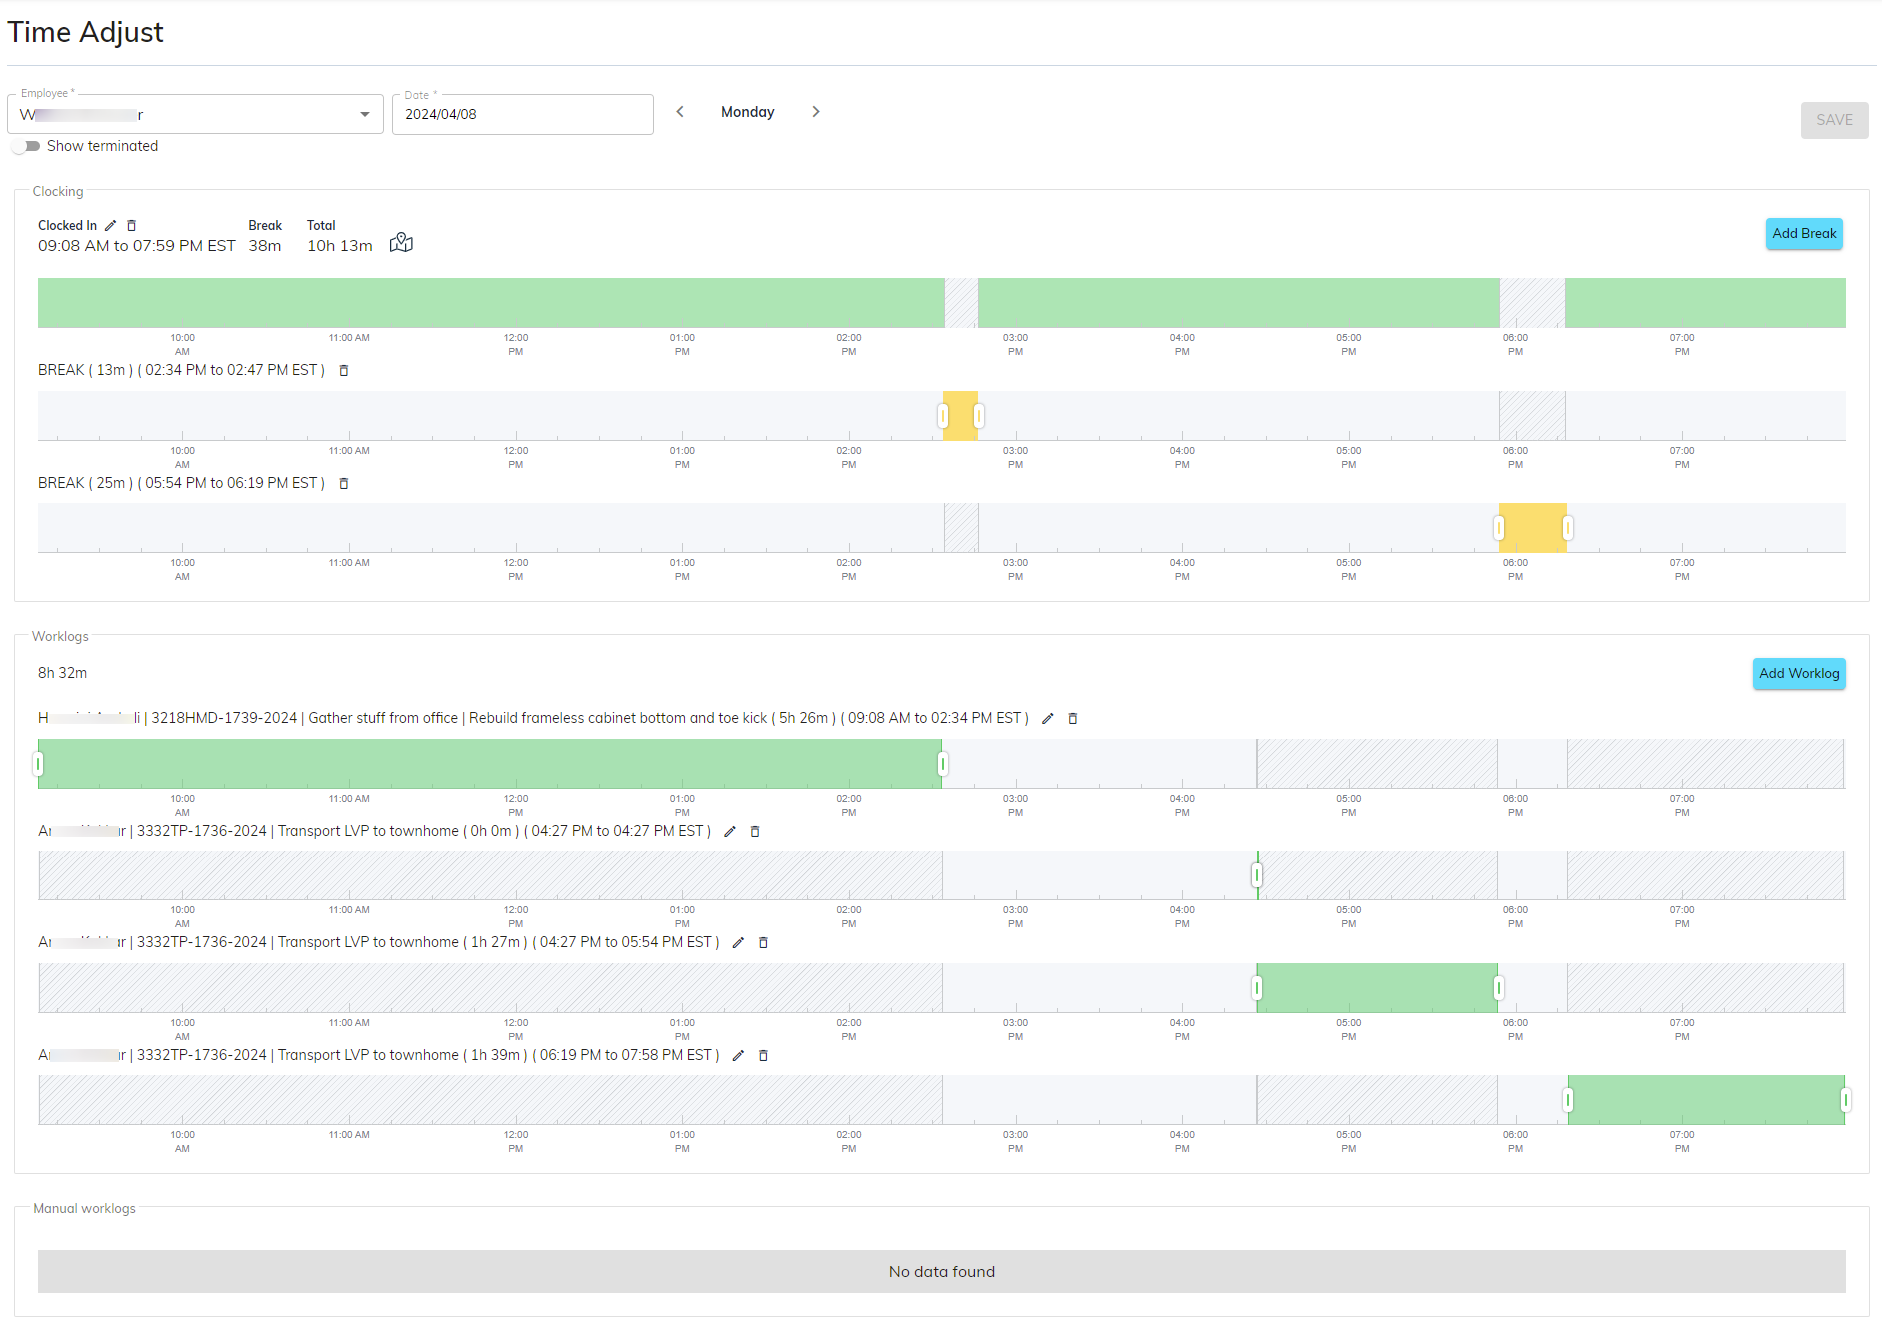
- To do a clocking time adjustment, first you need to select the specific employee whose time needs adjusting. Then, select the exact date for which the time adjustment needs to be made.
- Employee Name: Clearly identifies the employee whose timesheet is being viewed.
Show Terminated: If you want to make any changes in terminated employee clocking data, you can do that by enabling show terminated switch. By enabling the switch, you can see the list of terminated employees and select any of them.
Date: Displays the specific date for which the clocking data applies.
Day Navigation: You can see dedicated buttons with arrows ("<" for previous and ">" for next) to navigate one day forward or backward from the currently selected date. This allows you to quickly view clocking data for consecutive days. These navigation options make it efficient to review and adjust clocking data for a specific employee across multiple days.
Clocking, Break, Worklogs and Manual worklogs are different and not associated with each other.
After selecting the employee and date for a clocking time adjustment, sBizzl will typically:
- Verify Data Availability: sBizzl checks its database to see if there's any existing clocking data for the chosen employee and date.
- Data Found: If there is clocking recorded for that day, sBizzl will proceed to the adjustment options, allowing you to specify how you want to modify the recorded times.
- Data Not Found: If there is no clocking for that day, sBizzl will display a message indicating that the employee has not clocked in for this day.

- On Leave: sBizzl checks if the employee is on leave on the selected date and shows a message if the employee is on leave.

- Current Clocked In: sBizzl restricts the ability to edit or adjust existing worklogs, or add new worklogs, while the employee remains clocked in.

Clocking Data :
- If sBizzl finds existing clocking data for the chosen employee and date, it will typically present the information in a user-friendly format.
- When you drag the cursor along the timeline to adjust a logged time, sBizzl only allows adjustments in increments or decrements of 5 minutes. You won't be able to drag the cursor to an exact minute position, but rather to the nearest 5-minute mark.
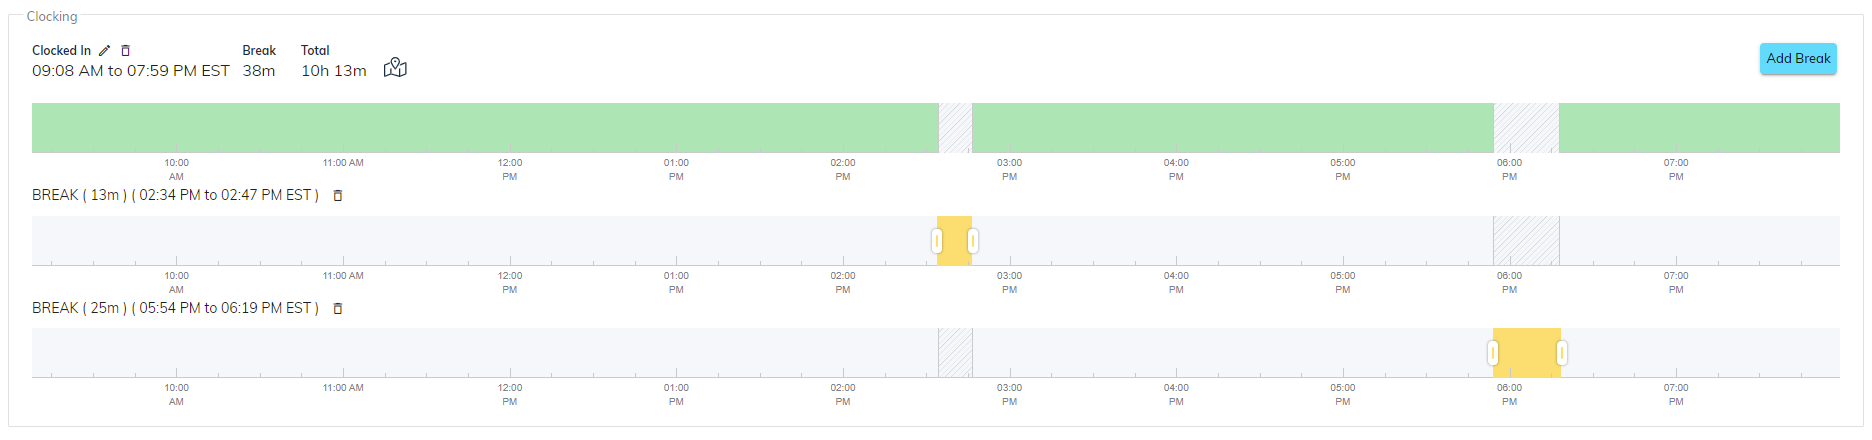
- In the initial view of the clocking section for a selected employee and date, sBizzl will typically display important time information, including:
Clocked-In Time: This shows the exact time the employee clocked in for the selected day.
Clocked-Out Time: This displays the time the employee clocked out, indicating the end of their day.
Timezone: This is an important element, especially for companies with employees in different locations. sBizzl will likely display the specific time zone associated with the employee’s shift timezone. This helps ensure clarity and avoids confusion when working across time zones.
Break: This displays the total break time taken between clocked-in and clocked-out time. Break time is displayed with yellow bars in the above image.
Total Work Hours: This calculates the total working hours by taking the total time between the employee's clocked-in and clocked-out times, and then subtracting the total break time. This ensures that the recorded working hours reflect the actual time spent working after accounting for breaks.
Clocking Detail Navigation: Clicking on the map icon could navigate you to a dedicated Clocking Details page which displays a timeline visualization of the employee's workday.
Add Break: If an employee forgot to clock-in to the break time during his/her work time, you can add a break bar and define the break time. Once you add the break bar, you'll likely be able to specify the start and end time of the missed break.
- Edit Clocked in/out Time: Editing clocked in/out times allows for correcting errors or making adjustments to employee work hours within a time tracking system. Depending on permissions, either the employee themselves or their manager might be able to initiate an edit clocked in/out time.

Clicking on the edit button next to the Clocked In label will open a dialog window showing a 24 hours timeline with 5 minutes adjustment.
A portion of the timeline will be highlighted or filled with a yellow color to indicate the currently selected time range. This selection bar moves along the timeline as you drag your cursor.
At the top of the timeline bar, it will likely display the total selected time in hours and minutes. This number dynamically updates as you move the selection bar along the timeline, providing real-time feedback on the new time you're choosing.
- Delete Clocked In Time: Deleting the clocked-in time will remove all clocking data (including clocked-out time and potentially breaks) associated with that date for the employee.
- In addition to the edit button next to the clocked-in/out label, there is a separate delete button.

Clicking the delete button will trigger a confirmation dialog box to prevent accidental deletion.
The dialog box will typically ask you to confirm your intention to delete the clocked-in time for the selected date.
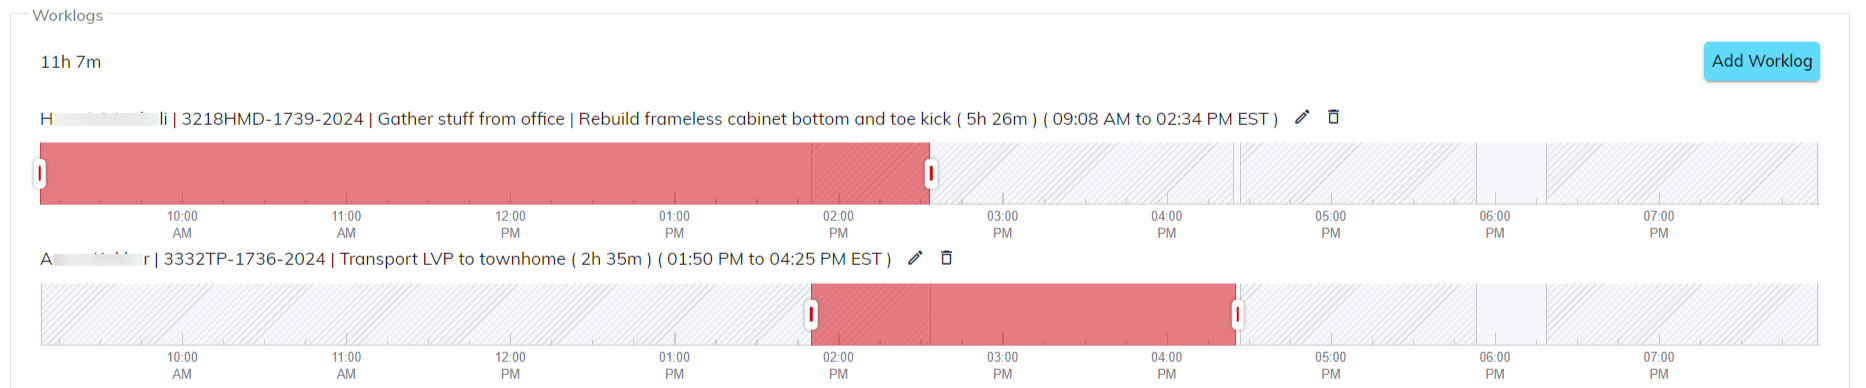
Worklogs Data :
- The section within the time adjust screen provides valuable insights into how employees spend their work hours. It goes beyond simply recording overall work time and delves into tracking time dedicated to specific tasks.

- The section presents a list of all tasks the employee worked on during the day, along with the corresponding amount of time spent on each task. This list format allows for easy scanning and identification of time allocations.
- Add Worklog:
- The worklogs data section not only displays existing logged times for tasks, but it often also allows you to add work time for tasks that haven't been tracked yet. This way, you can ensure all your work activities are properly accounted for.
Locate the Add Worklog button within the worklogs data section.
Click on the button. This will open a new dialog specifically designed for adding worklog entries.
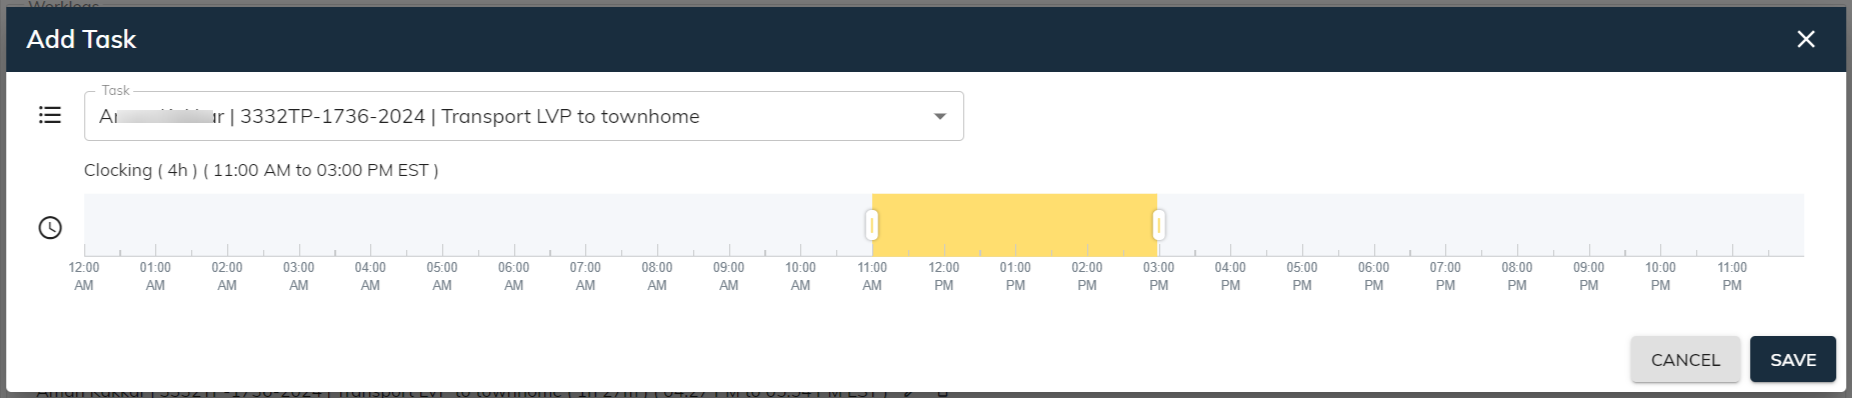
Select the name of the task you worked on. Employees will typically only see tasks that have been assigned to them for that date.
The timeline will show the 24 hours time range based on the selected employee’s shift timing.
Select the start and end time range by dragging the cursor along the timeline for the work you performed on the task.
Clicking a Save button within the add worklog window might only save the worklog entry within the worklogs data section itself. This allows you to potentially add multiple worklogs before finalizing them all at once.
A separate Save button, located at the top of the page, is likely required to finalize and save all the worklogs (including any existing updated ones) for your work day.
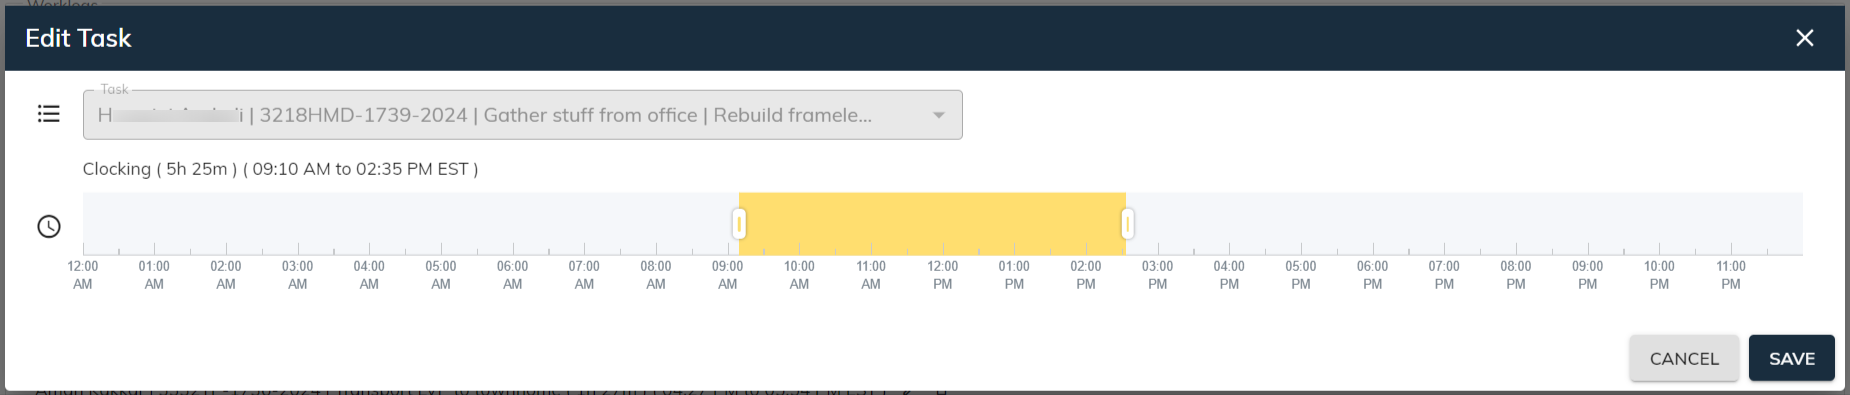
- Edit Worklog:
Interactive Timeline: Drag your cursor along the timeline in the desired direction. As you drag, sBizzl will display the updated logged time in hours and minutes next to the task title. Once you've positioned the timeline to reflect the correct logged time, release your cursor.
Edit Button: In addition to the timeline, there is an edit icon located next to the task title within the worklog entry. Clicking on this icon will open a separate editing window. You can drag the cursor along the timeline in the desired direction and it will display the updated logged in time.
- Delete Worklog:
- There is a delete button which is located next to the edit button
- This allows you to completely remove the worklog entry for the selected task.
- Clicking on the delete button, a confirmation dialog box will appear, asking you to confirm your intention to delete the worklog for this task.

- Overlap Worklog Timing:
- sBizzl can’t allow overlapping tasks time for Worklogs timeline bars. That means you cannot have two tasks for the same time period within a single worklog entry.
To easily identify overlaps, sBizzl uses color coding. sBizzl highlights tasks with overlapping time ranges in red. This red color coding would likely appear on the timeline representation of the worklogs or within the worklog list itself.
By preventing overlap, sBizzl ensures that each minute of work is clearly assigned to a specific task. This can be helpful for understanding how your time is allocated across different tasks within a project or workday.
When you are adding new worklogs or updating existing ones, sBizzl will not allow you to set work times for tasks that overlap with each other.
While sBizzl prevents saving worklogs with overlapping times whenever possible, there might be situations where you're accidentally creating overlaps while adding or editing worklogs.
- Global Save and Cancel Button:
This is the main action button to make any changes to clocking data of the selected employee for the selected date.
After you've made adjustments to the time entries within the time adjustment screen, you'll likely need to explicitly click a Save button to confirm and apply those changes to your worklog data.
If you decide not to apply the adjustments and want to revert to the previous state of your worklogs, you'll likely find a Cancel button. Clicking Cancel will discard any changes you've made within the time adjustment screen.
Manual Worklogs Data :
- This section shows manually added worklog by employees themselves, likely through a own task detail modal. This is a read only data and you can't make any change from here in the Time adjust screen.

The first row you see in the manual worklogs data section likely displays the total number of hours and minutes logged across all the tasks for the selected date. This value is calculated based on the individual durations of each worklog entry.
sBizzl displays the number of manual worklog entries right after the total worklog time, likely as a way to quickly inform you about how many entries are manually added worklogs.
Overall, the time adjust screen in sBizzl provides a comprehensive view of your logged work time and empowers you to make adjustments to ensure accurate time tracking.