Estimates
sBizzl enhances business image, by offering one notable functionality within customer details i.e. “Estimates''. Sending estimates boosts business by building trust, utilizing and allocating resources efficiently, pricing strategies and improving overall productivity.
Drafting estimates becomes effortless with sBizzl. You can create customized estimates that fits your business by including detailed descriptions, quantities as well as pricing for products and services seamlessly. It enables you to assess or determine the costs associated with the required materials, labor, equipment and other expenses, etc. This outlines the specific services or products included in estimates.
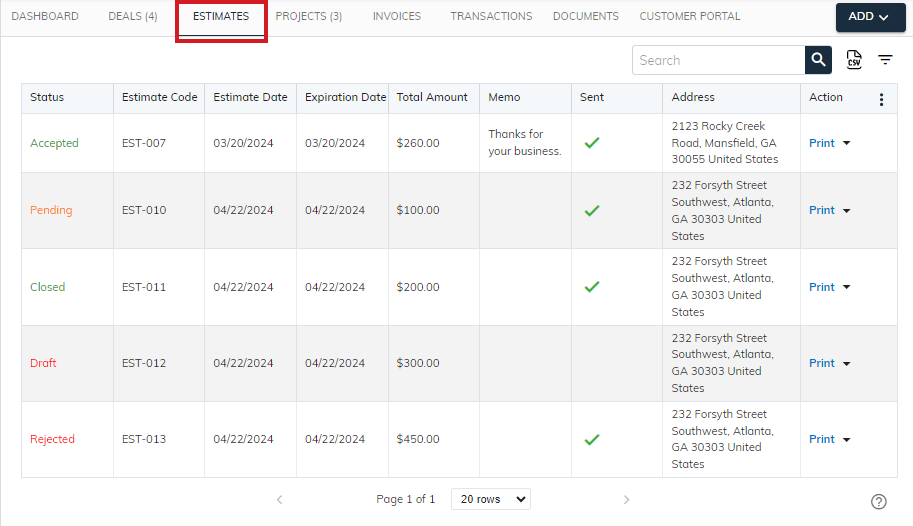
Estimate list within customer details can be a valuable feature for businesses. It would display a list of all estimates ever created for a specific customer. Sales teams can easily access a customer’s estimate history, allowing them to follow up on outstanding estimates, see if previous quotes have been approved or rejected. Therefore, reviewing past estimates can help identify patterns in customer preferences or buying habits, informing future sales strategies, resource allocation, and overall sales planning. The list allows you to effortlessly search, filter, sort by code, estimate date, status or expiration date, which leads to saving time and effort.
Here’s a breakdown of what each column might contain:
- Estimate Code: A unique code or identifier for each estimate used for internal tracking. This column can hold various codes depending on your organization's needs. Craft and manage estimate code at your fingertips.
- Estimate Date: This column refers to the creation date of estimates. The estimate date helps track the age of the estimate and identify if it might require revision due to potential changes in costs, project scope, or market conditions.
- Draft: The initial estimate is being created or reviewed internally before sending it to the customer.
- Pending: The estimate has been finalized and delivered or sent to the customer for their consideration or evaluation. If changes were made to the estimate based on customer feedback or internal adjustments. A revised estimate would be sent back to the customer for approval.
- Approved: The customer has agreed to the terms and pricing outlined in the estimate, moving the project closer to execution.
- Rejected: The customer has declined the estimate, potentially due to budget constraints, disagreement with terms, or other reasons.
- Closed: Once the customer has created the invoice from the approved estimates, then those estimates are closed.
- Expiration Date: It shows the date by which the estimate is valid. After this date, the pricing or terms outlined in the estimate might no longer be accurate and could require recalculation. It encourages timely decision-making from the customer and prevents misunderstandings if costs or terms change after the specified timeframe.
- Memo (Optional): This field is an optional message field available for users to include any additional information or notes.
- Total Amount: Total amount of the estimate.
- Address: It can be a customer’s billing address that associates with an estimate. By including an address column in the estimate list, you can streamline communication with the customer, ensuring accurate billing information throughout the sales process.
- Sent: The sent column with a tick mark (tick icon) serves as a visual indicator that the estimate has been successfully delivered/sent to the customer. It’s a quick and easy way to identify the status of each estimate, and improves workflow efficiency.
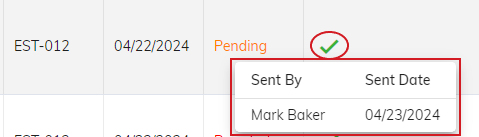
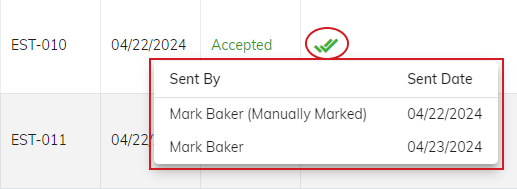
- Click on the “✔️” (tick) icon, to view sent email history. In sent history, it shows the email date and the user name who has sent the email.
- The sent column might be automatically ticked when the estimate is sent through a built-in email functionality. You can see (Manually Marked) message if the email has been marked manually.
- As you can see the “double tick” icon, if you have sent multiple emails.
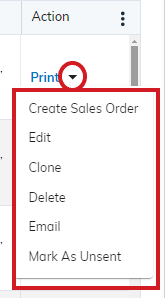
Actions: The actions column signifies a powerful tool associated with a specific estimate record. From this column, you can perform multiple actions, which significantly enhance the user experience and efficiency of the sales process. Depending on the permissions and roles, users can access certain action options.
It consists of multiple options that a user can perform which are listed below:
- All estimates have some common options which are Print, Edit, Clone, Delete and Email.
- Here, draft estimates have different action options as compared to other estimate statuses. It includes common options along with the Mark As Sent option.
- Pending estimates also have additional options such as Create Sales Order and Mark As Unsent. Once a sales order has been created from an estimate, the option Create Sales Order will be removed.
- Accepted estimates also have Create Invoice and Create Sales Order options. Once an invoice has been generated or a sales order has been created, both options will be removed.
- Closed and rejected estimates also have the Create Sales Order option, which will be removed once a sales order has been created.

- Print: A “print” option within the estimate list can be a valuable addition in sales processes. This will generate a PDF document of the estimate details, offering flexibility and convenience as well as encouraging paperless workflows. It supports advanced printing, customize layout, choose format, etc. Know more about PDF configurations and Boilerplate configuration options.
To print a PDF document, click on the “Print” button.

Click on the “▼” icon to view all the options.
- Edit: Allows authorized users to modify the details of an estimate.
- Click on the “Edit” button, it will open a dialog to edit the estimate as shown below.
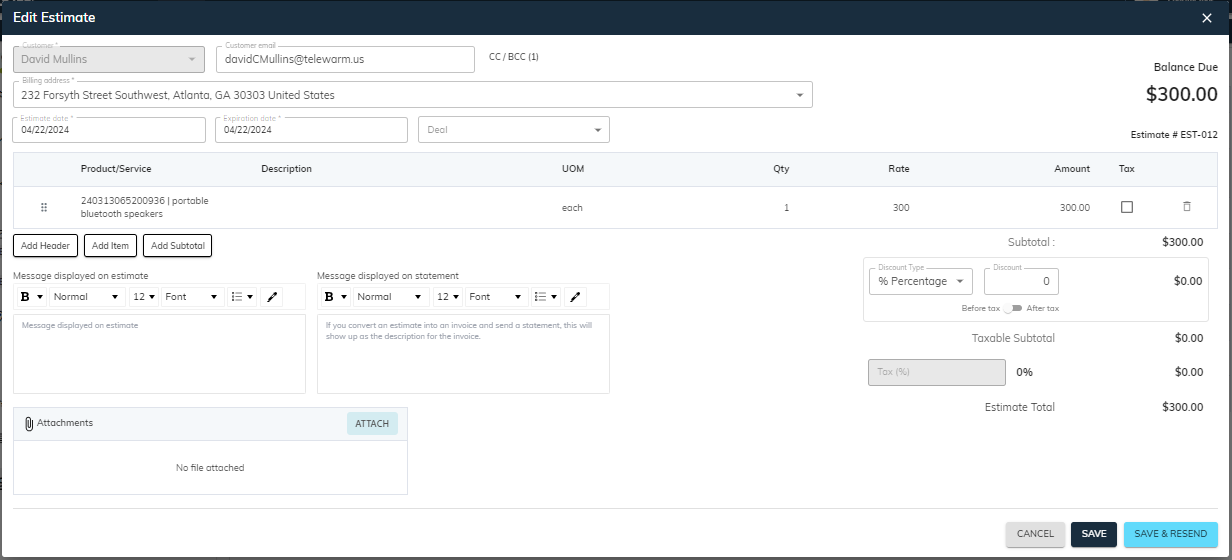
- Once an invoice has been generated, that estimate status will become Closed. If you want to edit any closed estimate, then you can update only billing address, estimate or expiration date, its associated deals, messages or memo, and documents. Here, you can’t make changes to line items and total amount.
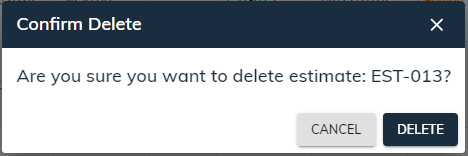
- Delete: Enables users to remove or delete unwanted estimates from the list. This becomes beneficial for outdated estimates, duplicates or estimates that are no longer relevant.
To delete estimate:
- Click on the “Delete” option, it will open confirm delete dialog with message and specific estimate code. Here, by clicking on the “Delete” button, the estimate gets removed while clicking on the “Cancel” or “X” closes the delete dialog.
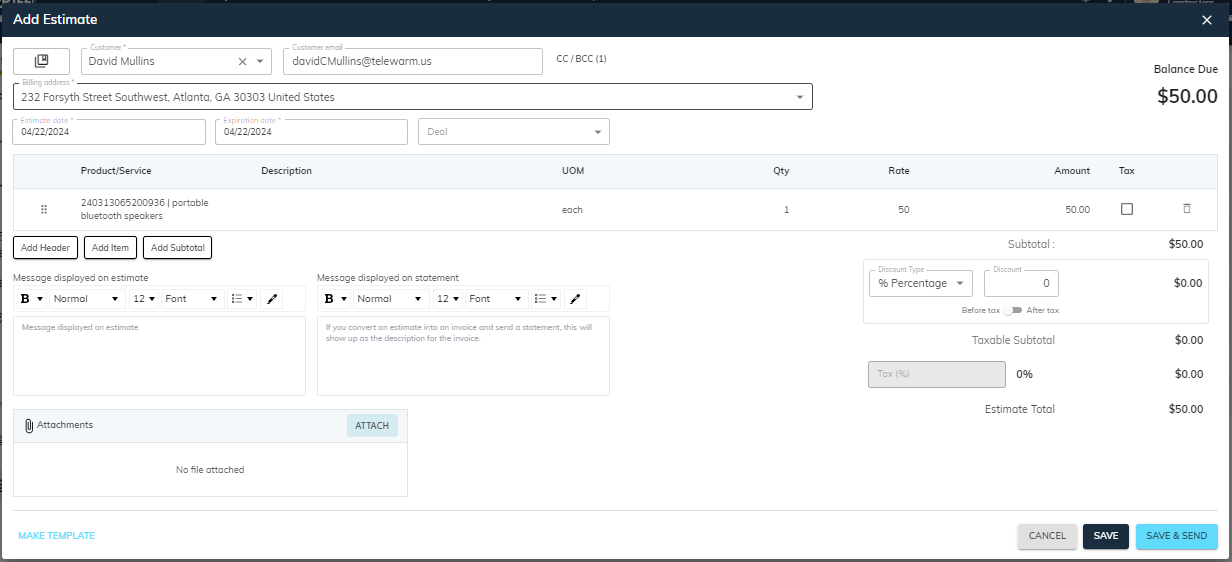
- Clone: Creates a copy of an existing estimate. The clone option allows for faster creation of new estimates based on existing ones, improving overall workflow efficiency. This can save time when creating a new estimate with a similar structure as a previous one.
To create a copy of an existing estimate, click on the “Clone” option. It will open the Add Estimate dialog with auto-fill details as shown below.
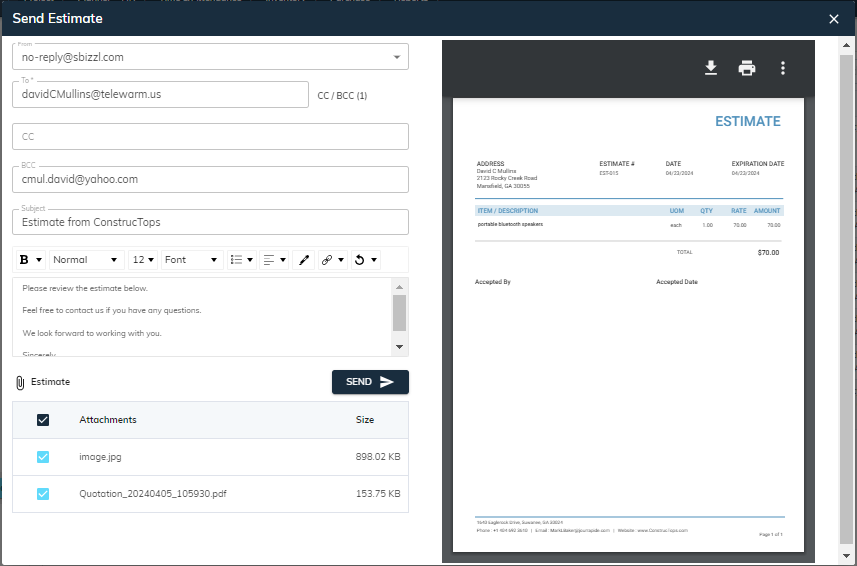
- Email: Provides a quick way to send the estimate directly to the customer’s email address by composing a new message. This will generate a PDF document from specific estimate details, streamlines communication and eliminates the need to find and attach the estimate manually.
- Note: You can configure the email address of the customer to send estimates. (explained above)
- To send email through built-in functionality, click on the “Email” option. It will open send estimate dialog, then define email addresses in TO, CC or BCC as well as enter subject or short description. If any additional document you want to send, then select it from the Attachments section, then click on the “Send” button.
- Mark as Sent: This option allows you to manually add a tick mark/indicator to the “Sent” column as well as updates the estimate’s status. This feature allows you to manage estimates, communicate with customers and make necessary changes without switching between different applications.
- Mark as unsent: This option allows you to remove the tick/sent indicator, if an estimate needs to be revised or recalled before sending it to the customer.
The email and mark as sent/unsent functionalities facilitate clear communication with customers by providing quick and easy ways to deliver estimates and track their status.
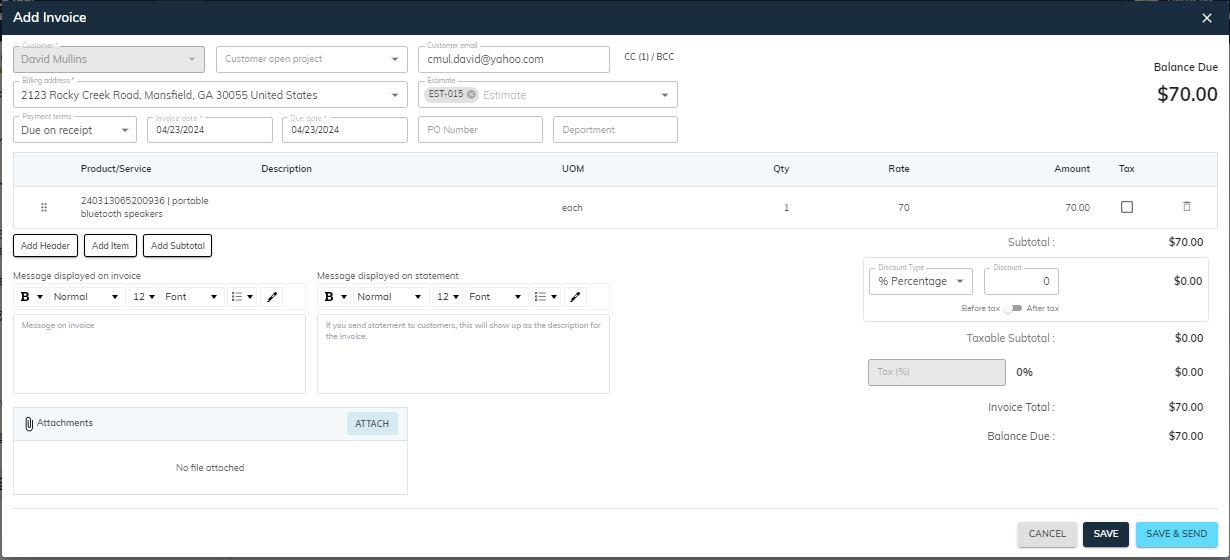
- Create Invoice: This option allows you to seamlessly convert an approved estimate into a formal invoice directly from the estimate list. The invoice would typically be populated with the details from the approved estimate, such as customer details, list of products or services, pricing and quantities, payment terms, taxes or discounts.
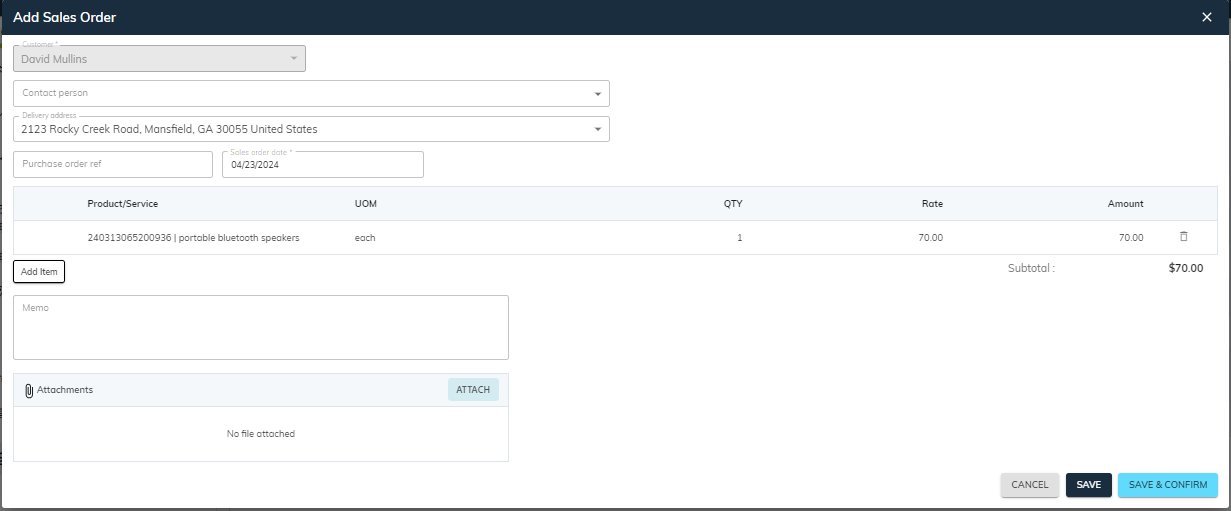
- Create Sales Order: This option enables you to generate a sales order directly from the estimate list. The sales order would automatically be filled with the estimate details such as customer information, list of products or services, pricing and quantities, etc.
Estimate Detail dialog
The detailed dialog of an estimate provides clear, consistent and comprehensive information, allowing for quick access, streamlining efficiency and productivity of the sales process.
To access specific estimate details, click on that record, it will open the Estimate Details dialog. (For example: To access EST-007 estimate information, click on the record.)
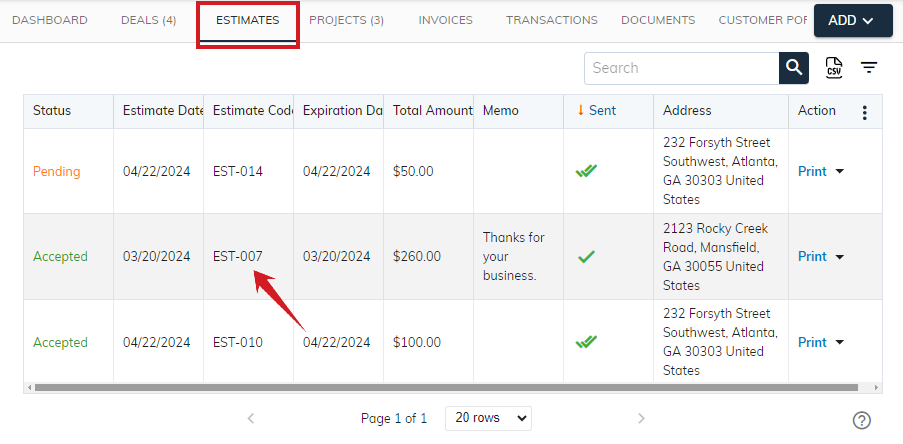
After clicking on the record, you can see below the Estimate Details dialog.
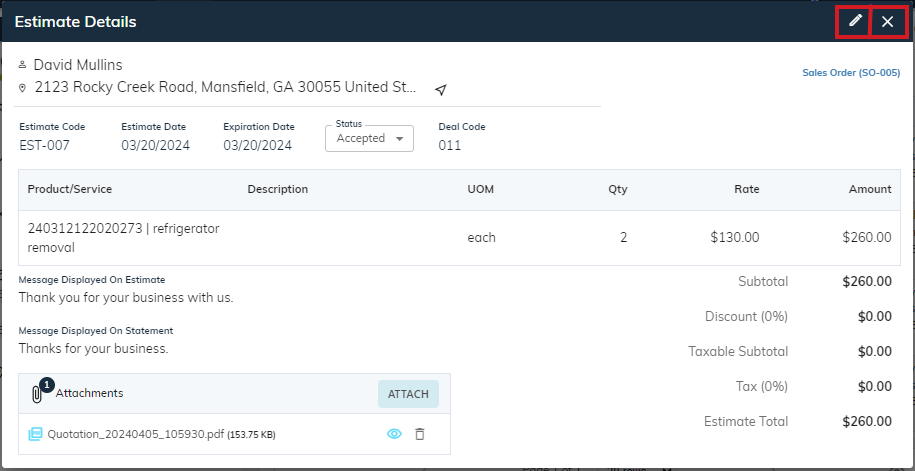
- Click on the “🖊️” (edit) icon to edit an estimate.
- Click on “X” to close the estimate details dialog.
Change Estimate status from estimate details dialog:
Changing the estimate’s status directly from the estimate details dialog is an interactive feature. As it eliminates options such as sending email to customer or mark as sent manually to change estimate’s status. This enhances the usability and effectiveness of the system.
As you can see below, you can change all the estimate’s status except the draft ones. Select Status from the drop down menu.

Refer interlined invoice or sales order from estimate details dialog:
- sBizzl supports navigation and interaction. Enables users to interact with the displayed interlinked invoices or sales orders, such as clicking on a sales order code or invoice code to view its full details.
- Ensure seamless integration between the estimate and the sales order or invoice module.
- If you have created a sales order from a specific estimate, then you can see the Sales Order navigation link along with code at the top right side of the detail dialog. (For instance: Sales Order (SO-005))

- Similarly, for interlinking with invoice, click on invoice code to view linked invoice details.

Likewise, you can also link deals with estimates at the time of creating a new estimate or update estimate.

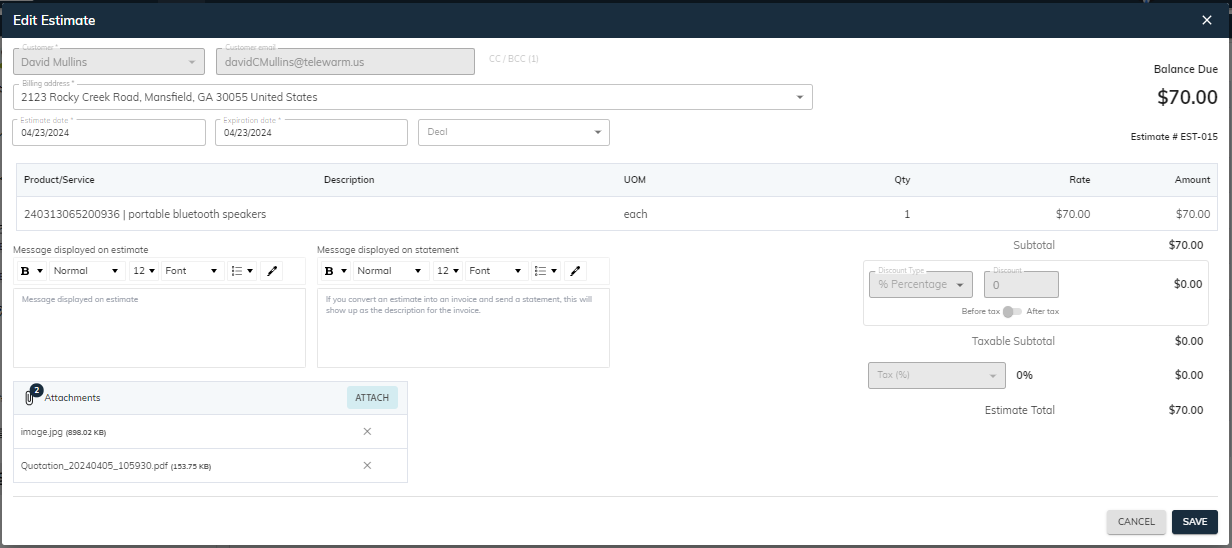
Attachments section in estimate details:
- A dedicated section is included within the estimate details dialog for attachments.
- By implementing an attachments section in the estimate detail dialog, empowering users to enrich their estimates with additional documentation and visual assets, facilitating better communication and collaboration throughout the sales process.
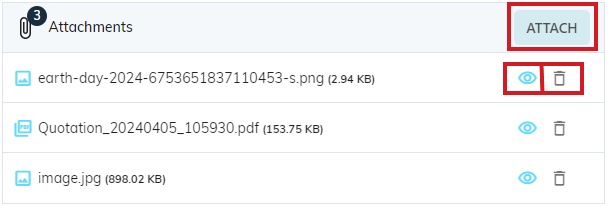
Provided with intuitive controls such as “Upload” button or drag-and-drop functionality, to allow users to add attachments to the estimate.
Provide visual indicators such as thumbnails or file icons, to help users identify the type of attachment (e.g., PDF or image).
Additionally, enable users to view or delete attachments associated with the estimate.
Further, users can view the total uploaded file count and size.