Configure projects pipelines
Project pipeline is a visual representation of all the projects within an organization, categorized by their current stage of project development. It acts like a roadmap, showcasing where each project stands and how it progresses through various phases from start to finish.
Configure Project Pipelines:
In sBizzl Web, Click on “ ⚙️ “ icon on upper right corner.
- Navigate to Projects > Projects > Pipeline. Employees must have permission to View and Add/Edit project pipelines to configure project pipelines.
- Click on Options > Add Pipeline button to create a new pipeline.
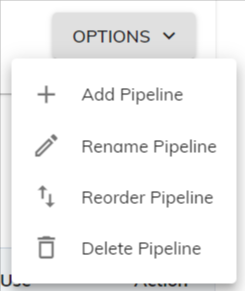
Add Pipeline:
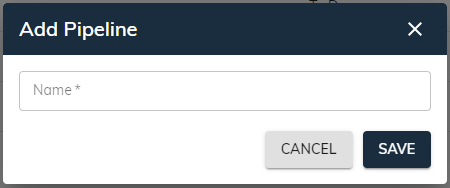
Click on the Add Pipeline option. This will likely open a form or modal window.
In the form, enter a descriptive name for your pipeline. This name should clearly reflect the purpose of the pipeline.
Once you've entered a name, locate the Save button. This button should be accompanied by a Cancel button in case you need to exit without creating the pipeline.
Click on the Save button. This will finalize the creation of your new project pipeline.
- You've created a new pipeline. You can now likely configure the different stages and settings specific to your needs.
Rename Pipeline:
Sometimes you might need to rename an existing pipeline to better reflect its purpose. Here's how to do that:
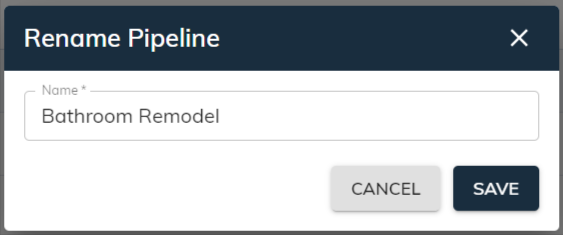
Locate the pipeline you want to rename. This might involve navigating to a pipelines list or dashboard.
Look for an Options button associated with the specific pipeline.
Clicking the Options button should reveal a menu or dropdown. Within the menu, find the Rename Pipeline option.
Selecting Rename Pipeline will likely open a small edit form or modal window. In the edit window, enter the new desired name for your pipeline.
Once you've entered the new name, confirm the change by clicking a Save button. This button should be accompanied by a Cancel button in case you need to exit without renaming the pipeline.
Reorder Pipeline:
Maintaining a logical order for your pipelines can improve usability and focus your team's attention.
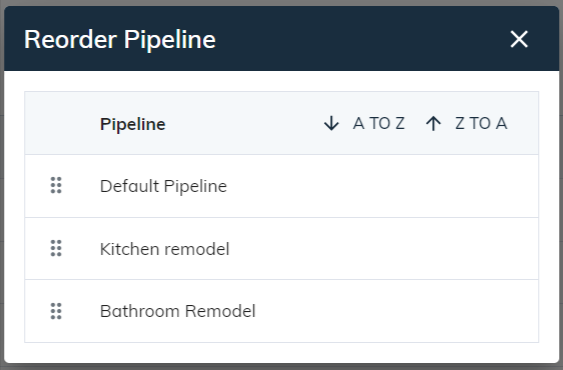
Look for an Options button associated with the specific pipeline.
Clicking the Options button should reveal a menu or dropdown. Within the menu, find the Reorder Pipeline option.
Selecting Reorder Pipeline will likely open a separate modal window or overlay. This modal window will provide a drag-and-drop interface for reordering pipelines. Simply click, hold, and drag a pipeline to your desired position in the list.
You have additional options for reordering pipelines besides drag-and-drop. You can reorder pipelines alphabetically (A-Z or Z-A) by name in Ascending/Descending order.
Delete Pipeline:
There might be situations where you need to remove an outdated or unused pipeline. Pipeline that's currently processing data, running tasks, or otherwise actively involved in a project can’t be deleted.
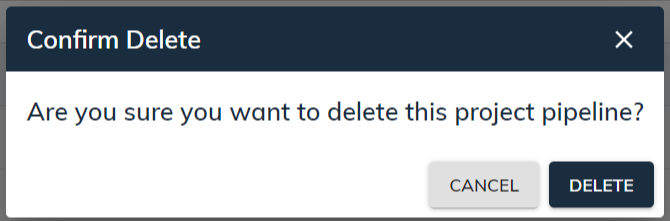
Look for an Options button associated with the specific pipeline.
Clicking the Options button should reveal a menu or dropdown. Within the menu, find the Delete Pipeline option.
Selecting the Delete Pipeline option will likely trigger a confirmation message. This message serves as a safeguard to prevent accidental deletion.
Review the confirmation message carefully. If you're certain you want to proceed, choose the Delete option. This button should be distinct from a Cancel button, which allows you to exit the deletion process without deleting the pipeline.
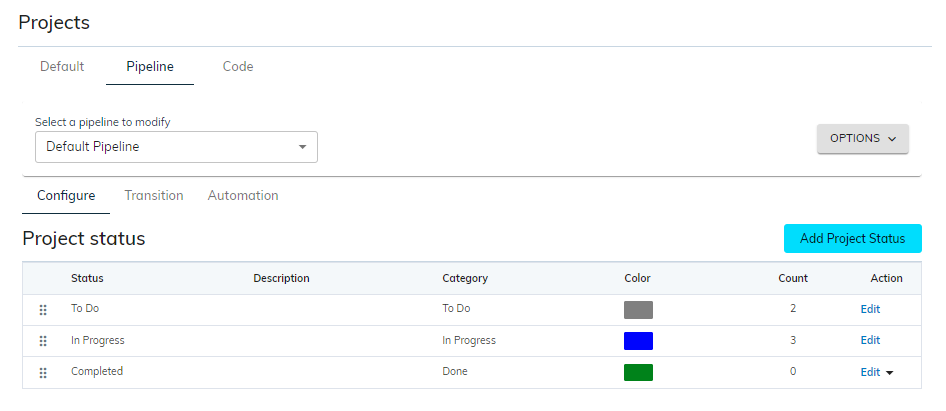
Configure Status:
Configuring project pipeline statuses involves defining the stages projects progress through in your project development process. You can create custom status for your pipelines to organize your records and track their progress. You can also edit or delete existing statuses.
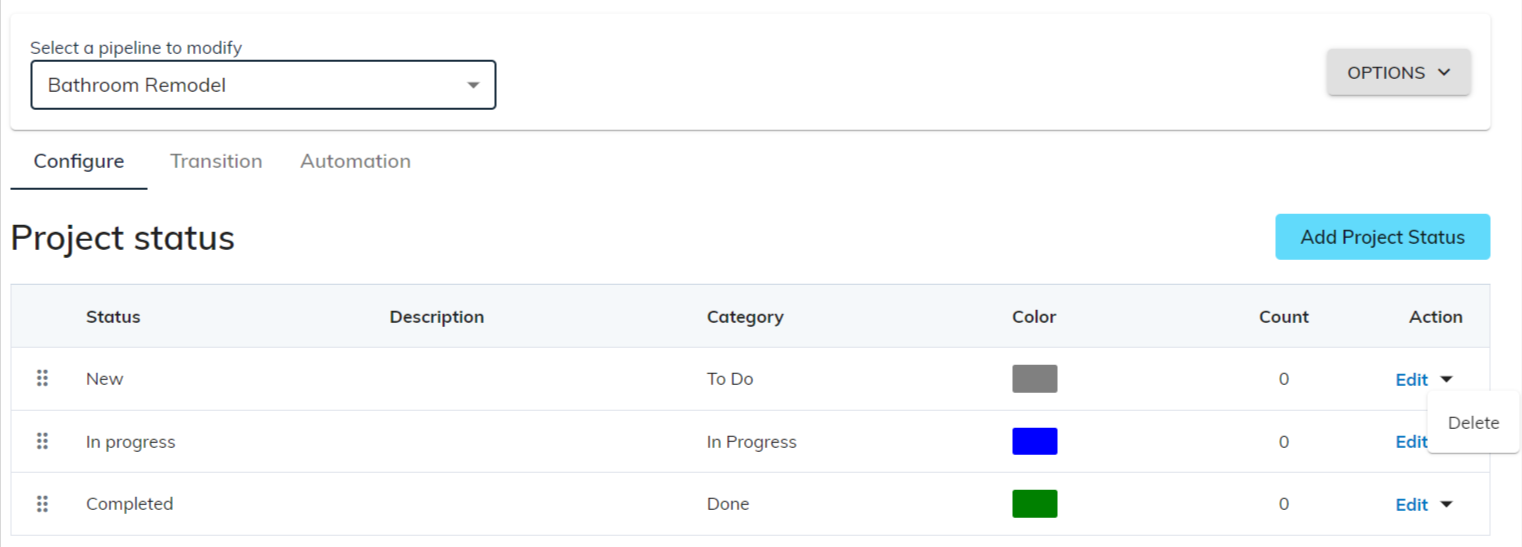
- When you create a new pipeline in sBizzl, it will automatically create three default statuses with the predefined Category to get you started. These default statuses provide a basic framework for managing the progress of your projects.
Here's a breakdown of what each column might contain:
Reorder : Look for drag-and-drop functionality within the list of pipeline statuses. This would allow you to rearrange the order by dragging and dropping statuses to your desired positions. The order of statuses dictates the processing flow for projects. Projects will typically progress through the pipeline statuses based on the order you establish.
Status : The name of a project pipeline status should be clear, concise, and meaningful to easily identify the stage a project is in within your project development process.
Description : Short description about the project pipeline status. Keep descriptions brief but informative.
Category : Categories group projects based on shared characteristics, offering a high-level view of your pipeline. Within each category, projects progress through various stages represented by statuses. Each status might have specific criteria or tasks associated with it before a project can move to the next stage. These statuses reflect the specific steps a project takes towards closure.
To Do : This stage serves as a capture point for new project ideas or proposals. This might involve collecting information from various sources, such as brainstorming sessions, client requests, or internal team suggestions.
In Progress : This stage indicates that active work is being done to move the project forward.
Done : This final stage captures the outcome of the project.
Color : Color can be a powerful visual tool to represent project stages in sBizzl pipeline, enhancing usability and providing a quick overview of project health. By associating colors with progress (e.g., green for project done, red for project not completed), your team can grasp project health at a glance.
In-Use : An In-Use column displaying the number of projects in each stage would be a valuable addition to a project pipeline. It helps managers understand the workload of their team at each stage of the pipeline. Stages with high numbers might indicate potential bottlenecks or resource allocation needs.
Action : An Action column with Edit and Delete options for project pipeline statuses can be a useful feature.
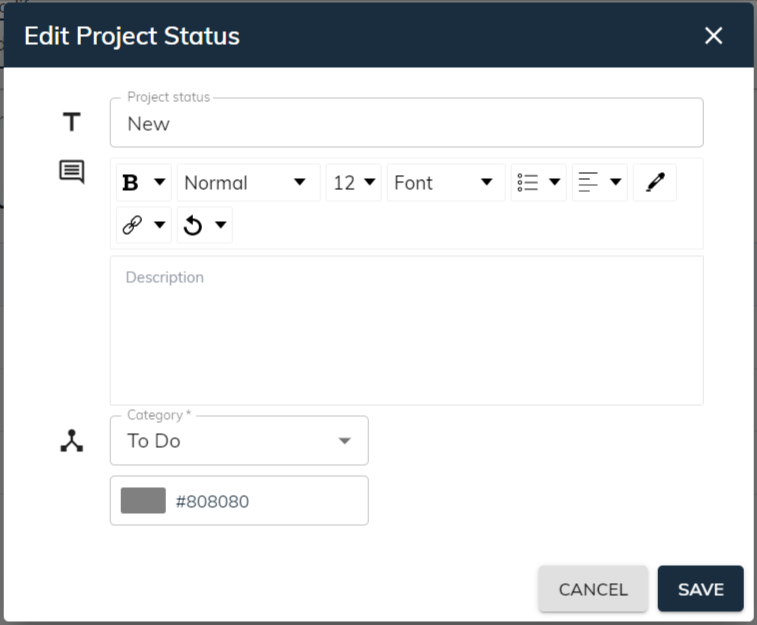
Add Status:
- Look for a button or option labeled Add Project Status. Clicking this will initiate the process of creating a new status.
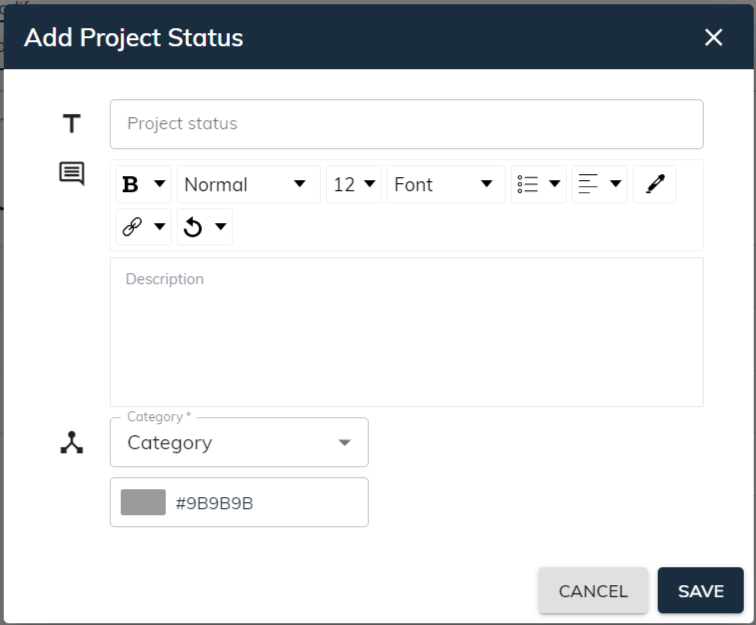
Project Status : Enter a clear and concise name that reflects the stage the new status represents in your project development process. This is a mandatory field.
Description : Provide additional short description about the project pipeline status. This is an optional field.
Category: Choose the appropriate category from a predefined list i.e. To Do, In Progress, Done. You must have to select at least one.
Color : Select a color that visually represents the stage.
Once you've entered the necessary details, save the new status. This will add it to your chosen pipeline.
Edit Status:
Look for an Edit option in the Action column.
Clicking the Edit option will likely open a small edit form or modal window. In the edit window, you can edit the desired information for your pipeline.
- After updating the information click on Save button to update the status information.
Delete Status:
- Look for a Delete option under the Action column. Clicking this will initiate a confirmation prompt.
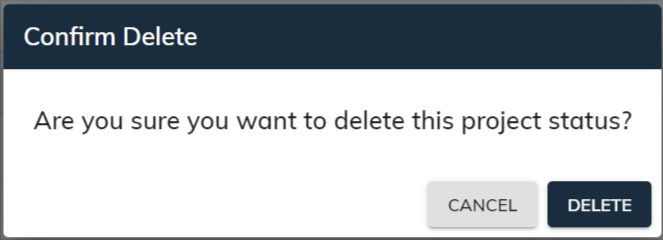
Clicking the Delete button would initiate the process of removing the chosen project pipeline status.
You will not have an option to delete status if the status is being used by any projects.
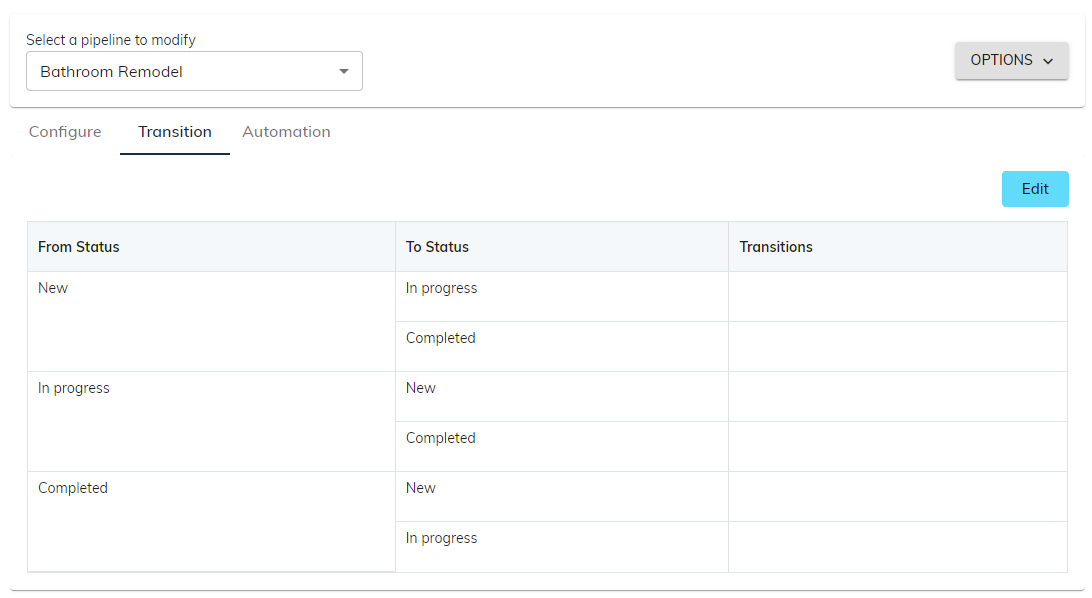
Configure Transition :
Transition refers to the movement of a project from one status to another. These statuses represent the different steps a project goes through in your project development process.
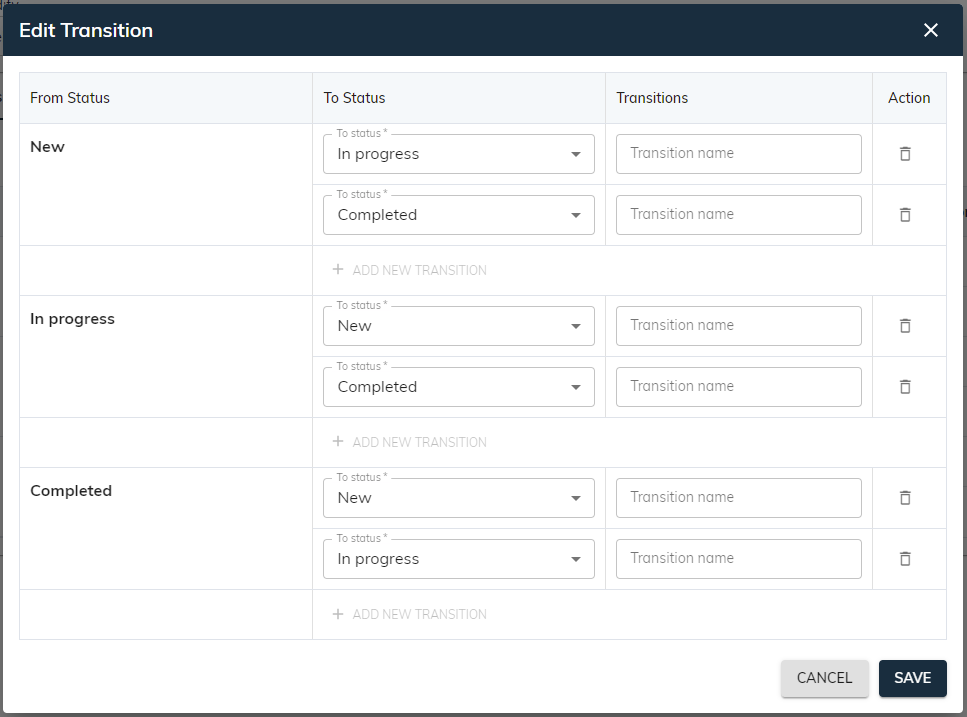
Edit Transition :
sBizzl provides pre-configured default transitions for your project pipeline. These default settings provide a starting point to manage your project development process, but you can often customize them to better reflect your specific needs.
Allows you to configure transitions to specify which statuses a project can move to from a particular status. This helps maintain a structured and controlled project development process.
There are dropdown menus next to each status where you can select the next status to move it to.
You can enter a descriptive transition name for each move between statuses.
You can also remove the next transition status set for your project process from the Action column.
Once you've configured the necessary statuses, click on the save button. This will add it to your chosen pipeline.
You can also configure an automation for each status. Learn here how to configure an automation for a project pipeline.