Add new automation
Workflow automation is essentially to streamline and automate repetitive tasks across different project work. It frees you from manual busywork and allows you to focus on more strategic aspects of your job. You define the steps involved and sBizzl executes them automatically, triggered by a specific event.
To configure an automation, first you need to configure pipeline statuses and transitions. Learn here how to configure a project pipeline.
To configure an automation, navigate to Settings > Projects > Projects > Pipeline.
Select a pipeline in which you want to configure workflow automation.
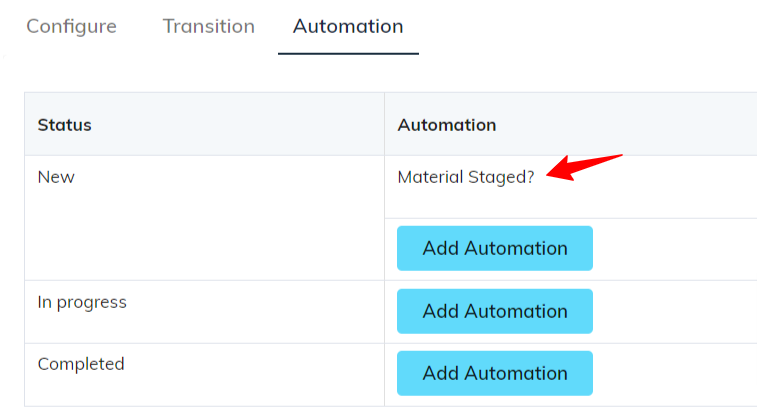
Select the Automation tab.
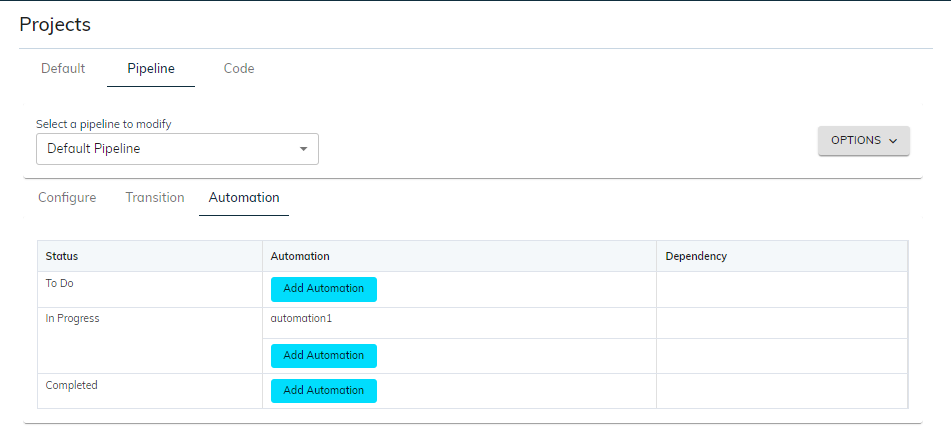
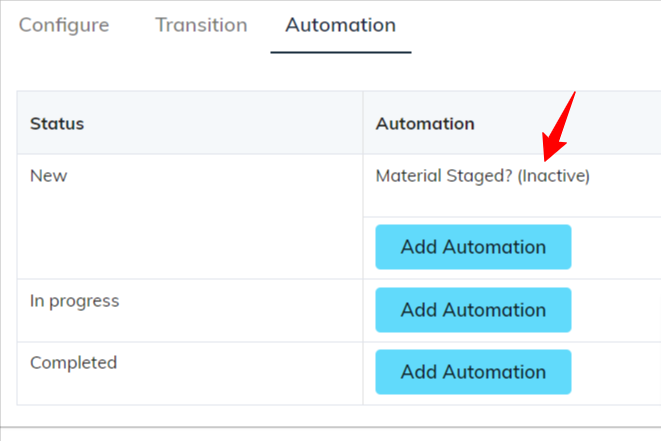
Here, you can see all statuses configured in the selected pipeline.
For each status, you can configure multiple automation.
Add Automation :
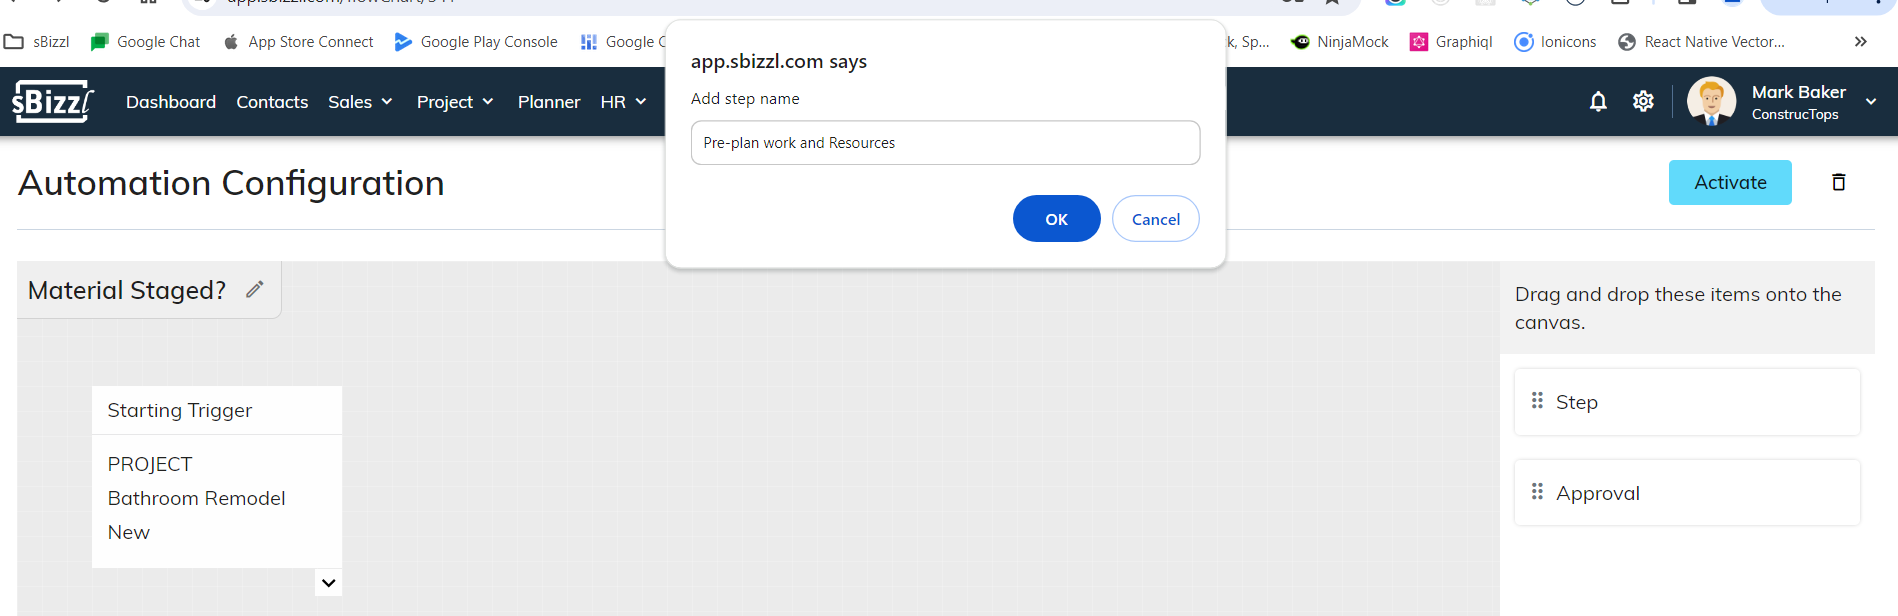
- Click the Add Automation button to initiate the creation process. It will open a pop-up dialog to enter a meaningful automation name.
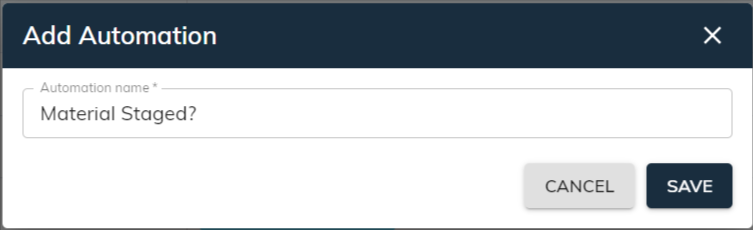
- Enter a clear and concise name that reflects the action the automation performs, optionally including the trigger if relevant.
Click Save to finalize the automation. The chosen name will be displayed in the Automation column associated with the relevant status.
On the successful completion of adding automation, it will redirect to the Automation configuration page to configure triggers.
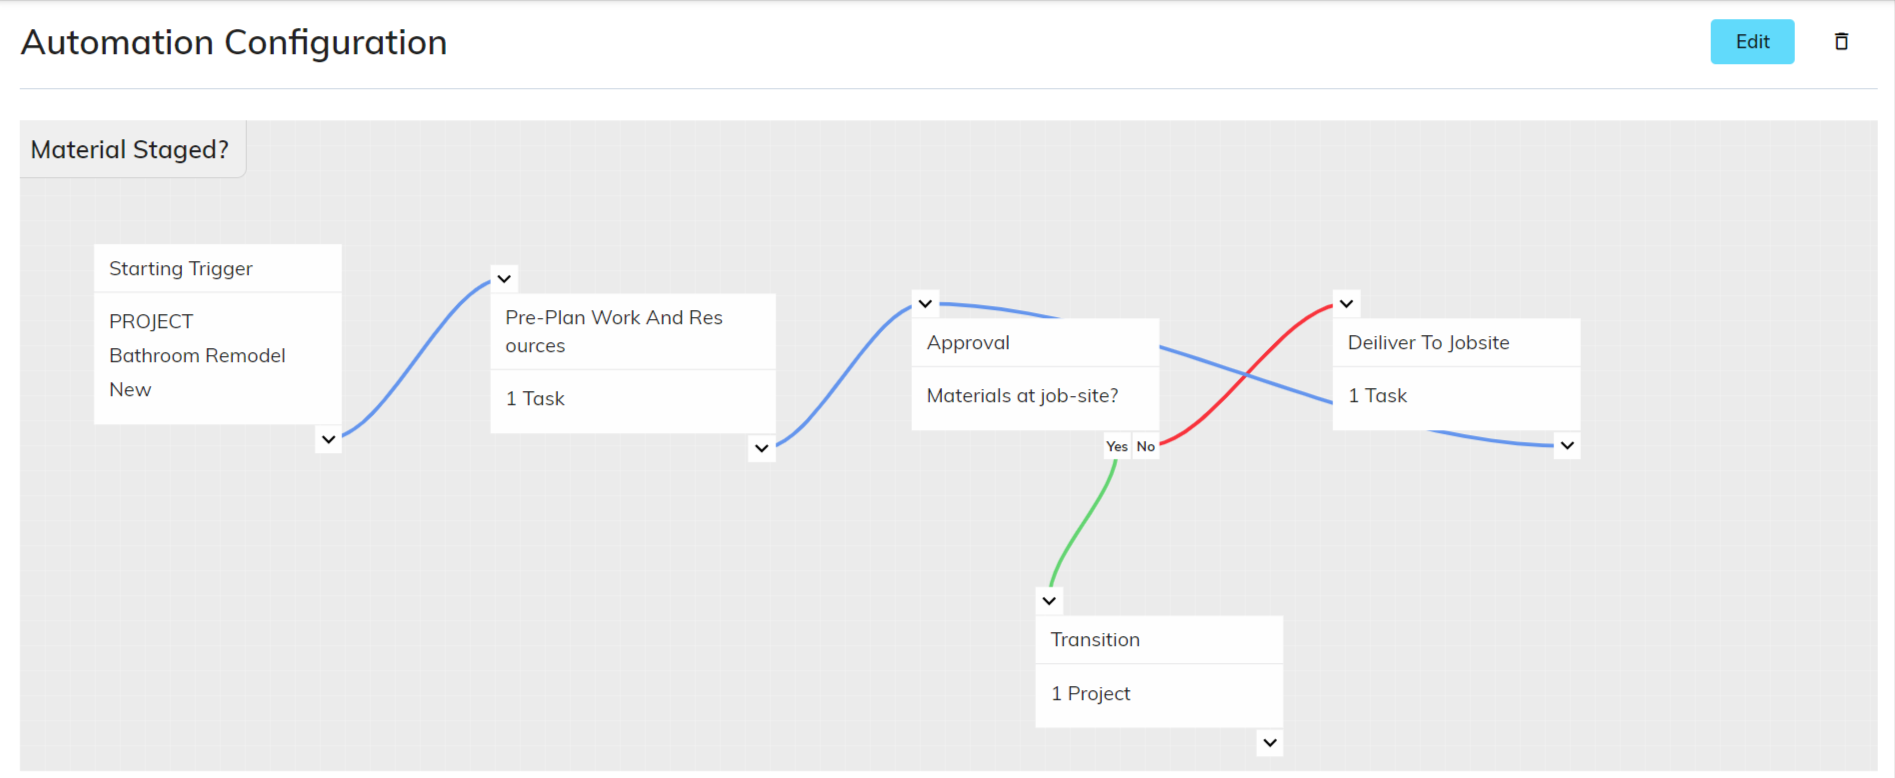
Automation Configuration :
To trigger the automation, you need to configure the different trigger stages which includes Steps or Approval. When you add an automation, it will redirect to the automation configuration page and is in an inactive state.
- On the configuration page, you'll define the event that will initiate the workflow. This might involve configuring custom options.
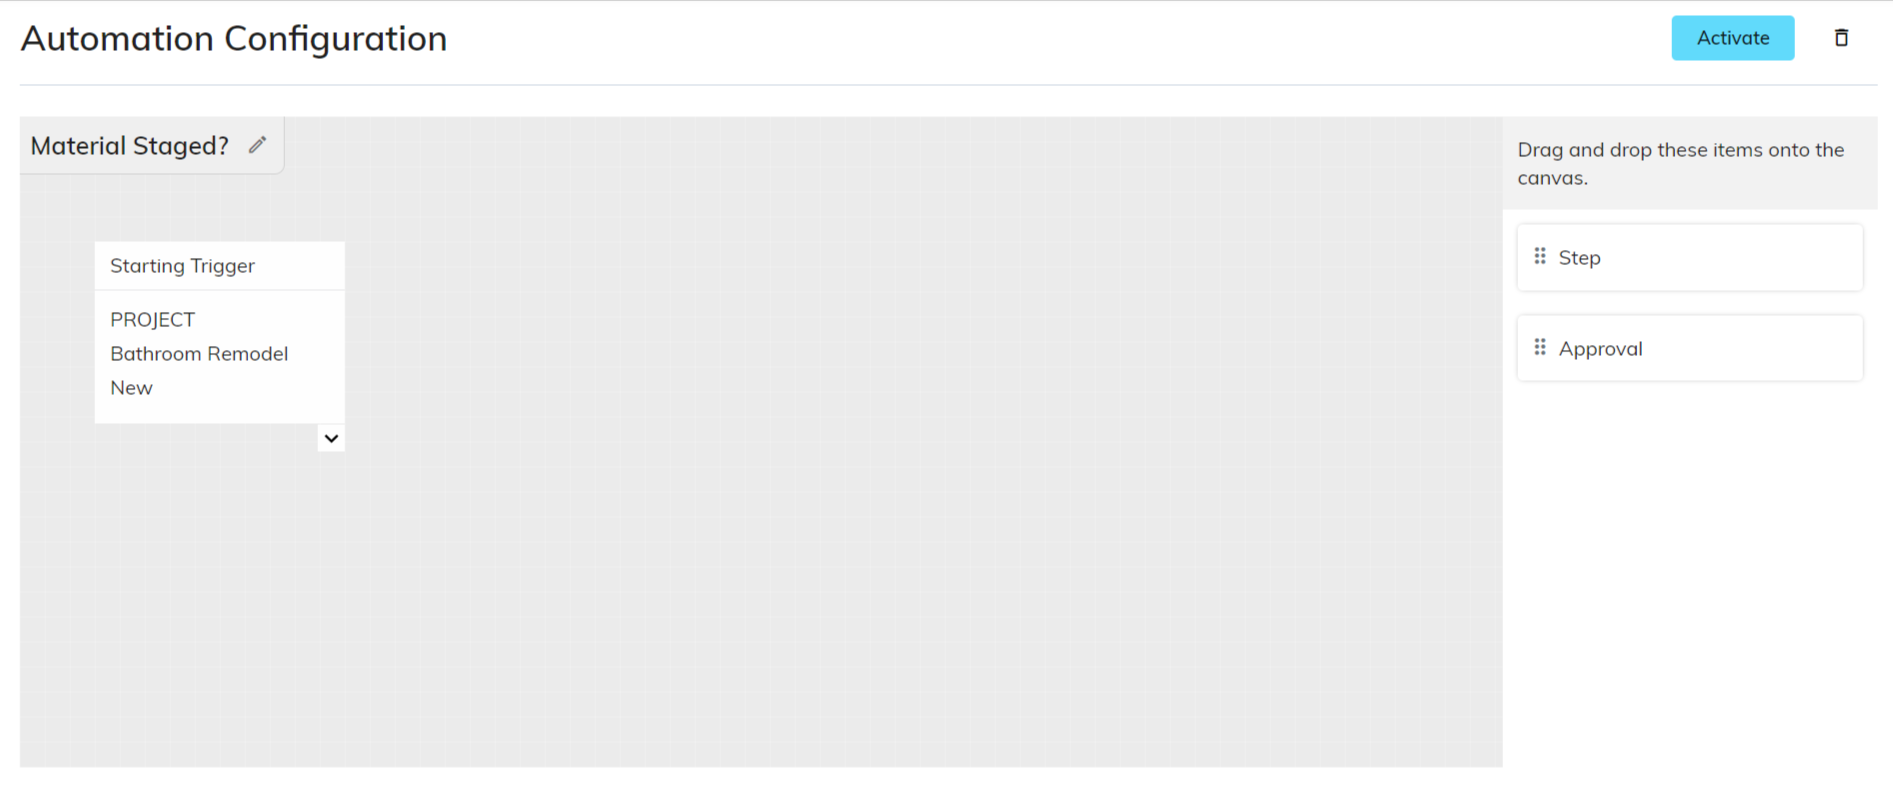
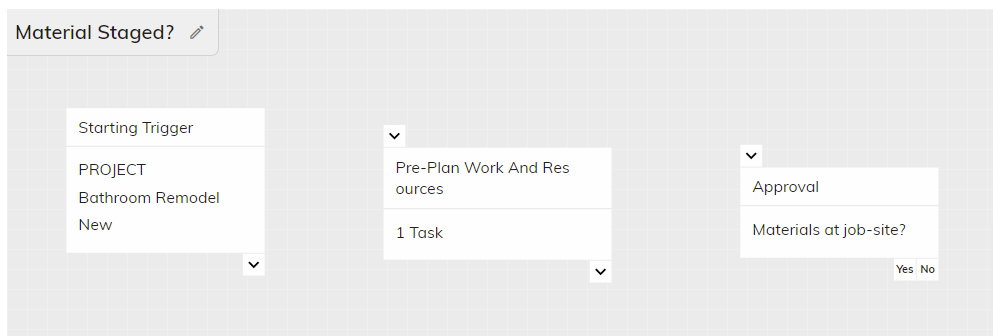
Name: Material Staged? is an automation name. You can edit the name when automation is in inactive mode.
Starting Trigger: Starting triggers are the foundation of workflow automation. They define the event that kicks off the entire automated process.
Step: Steps represent the individual actions or tasks that need to be completed within the workflow. This might have contained tasks and status updates during the workflow.
Approval: Approvals represent a point in the workflow where a decision needs to be made. This typically involves someone reviewing something and granting permission to proceed.
Activate: Clicking the Activate button essentially turns on the workflow. It becomes part of the active automation process and will start executing when the defined trigger occurs. Only activated workflows will actually run and perform the intended actions. This prevents accidental execution or confusion from inactive workflows.
Delete: Clicking the Delete button will remove the workflow entirely from the automation process. Once you delete a workflow, it's permanently removed from the system. There's typically no undo function, so be sure you want to delete it before clicking the button.
Once the trigger is set, you can define the actions to be performed when the trigger fires. This could involve creating tasks, updating project status or tasks approval actions specific to your workflow.
Starting Trigger :
They are the essential building blocks that initiate the entire workflow process. They act like a switch, turning on the automation when a specific event occurs.
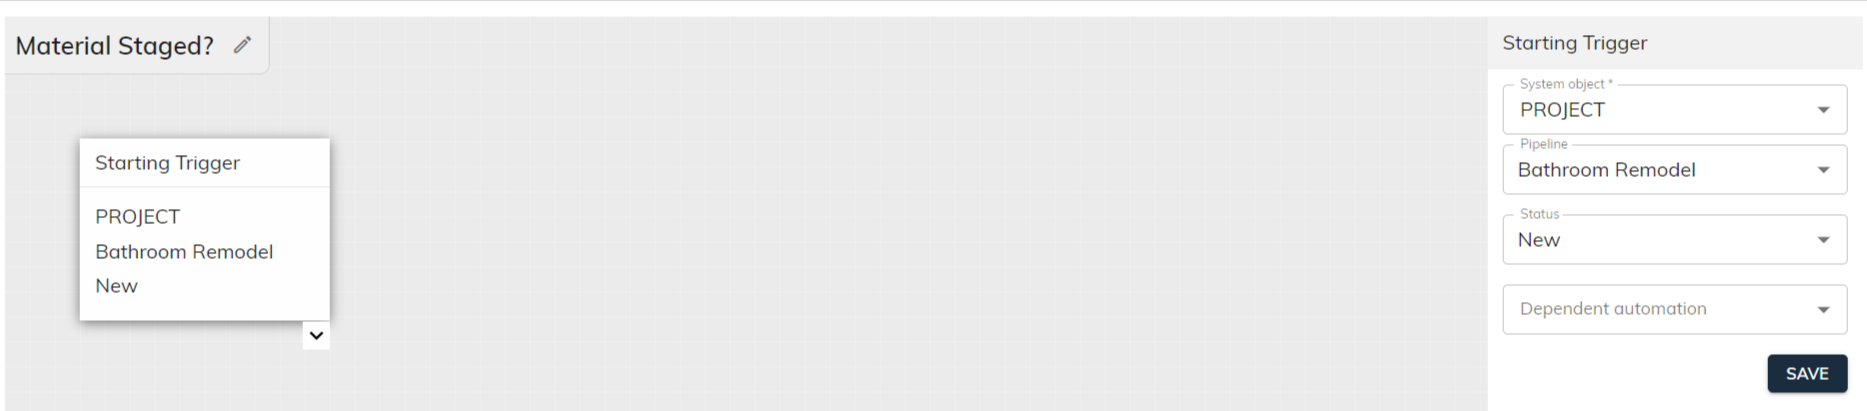
Selecting the Starting Trigger will show the trigger details in edit mode to make any changes in that.
System Object: This could specify the type of data or entity within the system that the trigger applies to. It is a Deal or a Project.
Pipeline: Pipelines are often used in project management workflows to represent different stages or steps. This section would likely indicate the specific pipeline where the trigger can be applied.
Status: This likely refers to the status within the pipeline that will trigger the workflow.
Dependent automation: This might show if the selected trigger has any dependent workflow.
Add Step :
Adding steps is what truly builds the functionality of your workflow automation. Steps are the individual actions or tasks that the automation performs within the workflow. These steps can be manual tasks that someone needs to complete. The order of the steps is crucial. You define the sequence in which the automation should perform each action to achieve the desired outcome.
By dragging and dropping a step onto the canvas, you initiate the process of adding a new step to your workflow.
As you drag and drop, the system prompts you to enter a name for the step. A clear and concise step name is essential for understanding what that particular action does within the workflow.
- For the workflow to function correctly, each step needs to be connected to the previous step or, in the case of the first step, to the starting trigger. This linking essentially defines the flow of the automation.
- By selecting the step, you can see edit and delete buttons above the Add Action button as shown in the above screenshot.
- Edit: Clicking edit button allows you to modify the existing step title. Once you click edit, you'll likely be able to directly edit the text of the step title and click on save button to save the changes.
- Delete: This option allows you to remove steps that are no longer needed or that might have been added accidentally. To prevent accidental deletions, it displays a confirmation pop-up window to delete the selected step. Deleting a step might affect subsequent steps in the workflow or break dependencies between them.
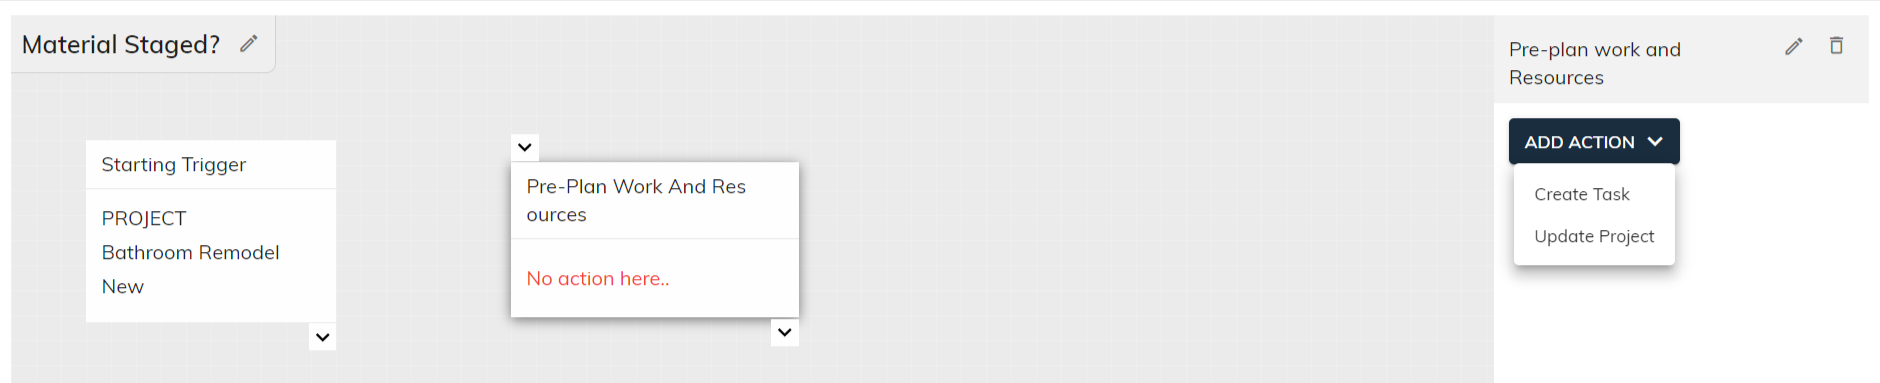
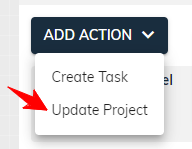
Once you've added a step, you need to define what action that step should take within the workflow. This is where you specify the functionality of each step.
Select the step and look for an Add Action button as shown in the above screenshot.
Create Task :
Clicking Add Action reveals a Create Task option. This allows you to configure the step to create a new task within the system. This task could be assigned to someone on your team, prompting them to take further action.
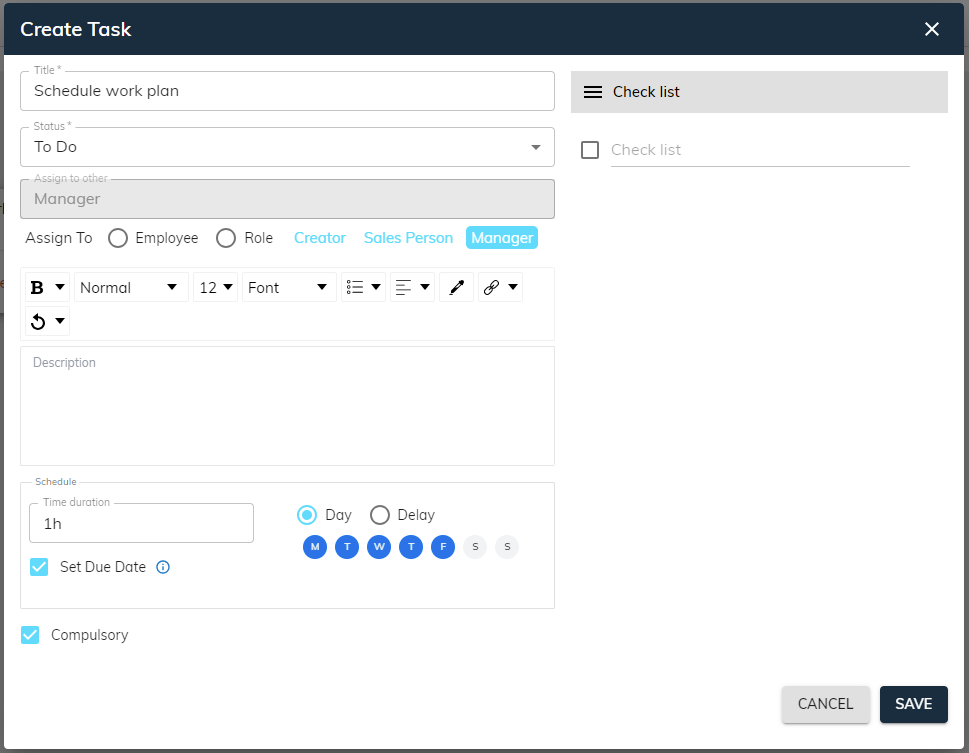
Title: Give a clear and concise title that quickly conveys the essence of the task. Start the title with an action verb that describes what needs to be done.
Status: Define what might be the starting status of the task. It is a predefined statuses like, To Do, In Progress, Completed.
Assign To: Assigning a responsible person is crucial for ensuring tasks get completed within your workflow automation.
- Employees: You can assign tasks to specific individual employees within your team. This is ideal for tasks requiring a particular skillset or expertise.
Roles: You can assign tasks to roles instead of individuals. This is useful for situations where the specific person doesn't matter as long as someone with that role completes the task.
Creator: You might want to assign the task to the creator. This could be for tasks requiring their specific attention or approval.
Sales Person: You can assign tasks to sales person based on a particular project involvement.
Manager: You can assign tasks to the project manager based on a particular project involvement.
Description: Include relevant details that provide context for the task.
Time Duration: Define the time duration for this particular task to complete. This could be a combination of day, hour or minutes like 1d 2h 30m. This will define the start time and end time of this particular task based on the defined time duration.
Set Due Date: Setting a due date clarifies the expected completion time for a task. Due date will be set to be the same as the scheduled end date.
Schedule Day: This option allows you to schedule a task to run on a specific day of the week, but it will only run on that chosen day. If you want a task to schedule on weekdays (Monday to Friday) and exclude weekends (Saturday and Sunday), you can select days as shown in the above screenshot.
Schedule Delay: This option allows you to schedule tasks that are dependent on the completion of a previous task within the workflow. The new task won't schedule until a specified delay has occurred after the previous task is finished.

- This functionality is helpful for situations where you need a specific time gap between tasks.
- You can define the delay time duration using the format mentioned earlier (e.g., 1d for 1 day, 2h for 2 hours, 30m for 30 minutes). This delay applies after the previous task reaches a completed state.
Compulsory: The compulsory option in workflow automation signifies a task that must be completed for the workflow to progress further. Any task requiring a specific action that's vital for the workflow's success should be marked as compulsory.
Check List: Checklist points promote a structured approach to task completion. The assignee can systematically check off each point as they progress, ensuring nothing gets missed.
Clicking Save after defining the task details finalizes the creation process. The task with its assigned actions, description, due date, and any checklist points becomes part of your workflow.
Clicking Cancel discards any progress made on creating the task.
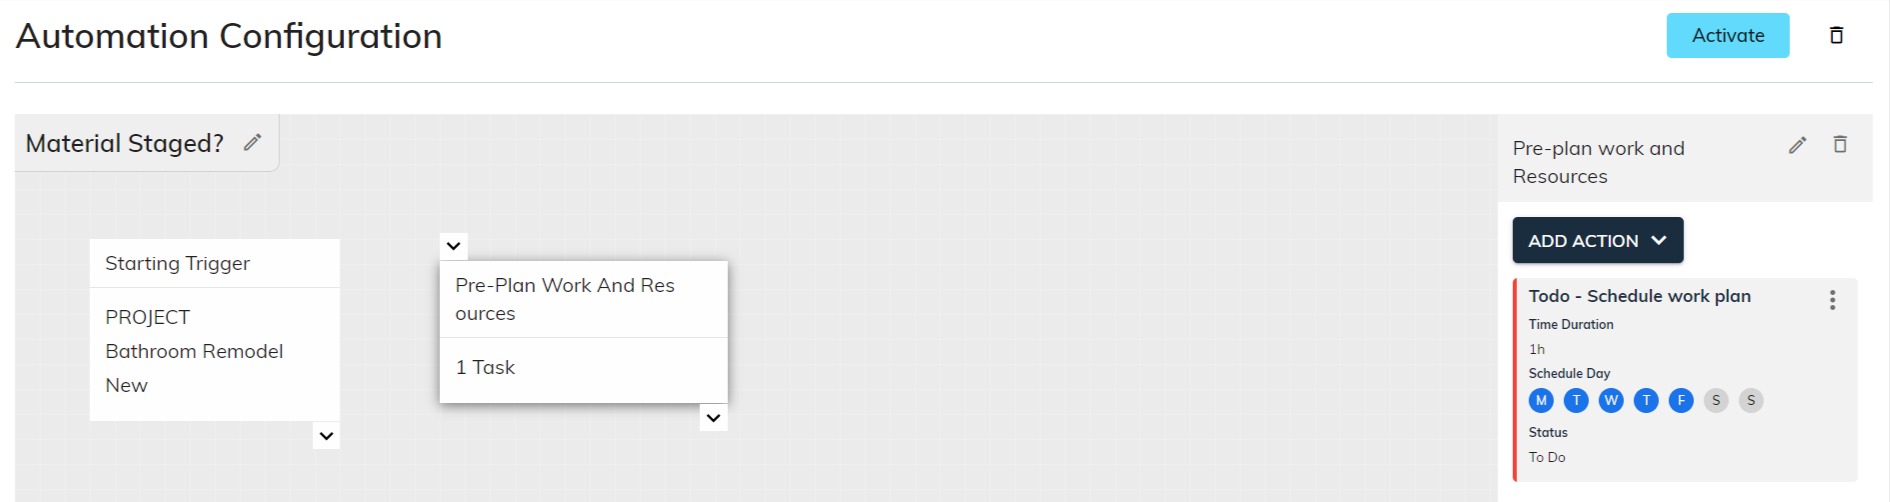
- Once you successfully added the task, it redirects to the canvas and on the right side you can see the details of the newly created task you just configured. It might display the information you entered earlier (Title, Time duration, Schedule day, Status, etc.) and additional options for editing or deleting the specific task.
- When you click on the three vertical dots (፧) associated with a particular task within your workflow, a small menu appears next to the dots. This menu typically presents options relevant to managing that specific task.
- Edit: Selecting this option likely opens a form where you can modify the details of the task you selected. This could involve changing the assignee, adjusting the schedule, revising the description, or updating any other configurable aspects of the task.
- Delete: Selecting this option permanently removes the chosen task from your workflow.
- The thick red line on the left side of the task detail card serves as a clear visual cue. It immediately identifies the task as a compulsory task.
Approval :
An approval step in workflow automation is indeed used to create a decision-maker task.
By dragging and dropping an approval onto the canvas, you initiate the process of adding a new approval task to your workflow.
Upon dropping the approval step, a form likely appears on the right side of the interface. This form provides options to configure the details of the approval process.
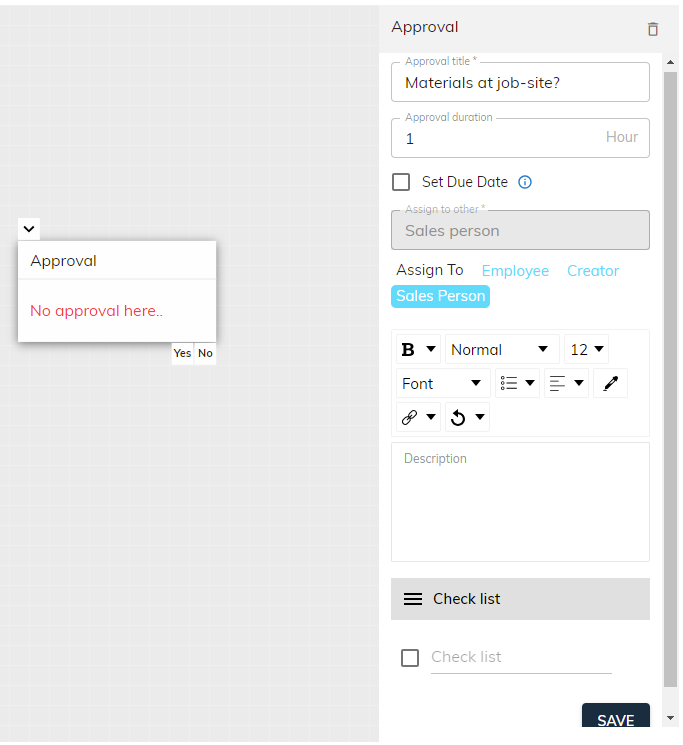
- Approval Title: Give a clear and concise title that quickly conveys the essence of the approval task. Start the title with a verb that highlights the decision required.
Approval Duration: Based on the chosen duration, the workflow tool automatically calculates the start and end dates for the approval task.
Set Due Date: Setting a due date option clarifies the expected completion time for a task. Due date will be set to be the same as the task end date.
Assign To: Specify who will be responsible for making the approval decision. This could be an individual's name, creator or a sales person.
- Employees: You can assign an approval task to specific individual employees within your team. This is ideal for tasks requiring a particular decision maker.
Creator: You might want to assign the approval task to the creator. This could be for tasks requiring their specific attention for approval.
Sales Person: You can assign tasks to sales person based on a particular project involvement.
Description: Briefly explain what the task is about, why it's important, and what information or resources might be needed for completion.
Check List: Checklist points help ensure the decision-maker reviews all aspects of the information presented for approval. This minimizes the risk of overlooking important details.
Once you click Save, the workflow finalizes the creation of the approval task and integrates it into your workflow sequence.
The approval task presents the decision-maker with two clear options, Yes and No. This indicates a binary choice scenario where the decision-maker needs to either approve or reject the task.
- Yes: If the decision-maker selects Yes, the workflow likely proceeds to the next step linked to that option. This could be a subsequent task that relies on the approval or a final step signifying completion.
- No: If the decision-maker selects No, the workflow likely diverts to the next step linked to that option. This might involve sending the task back to the previous step in the workflow.
Linking Step and Approval :
Linking steps defines the order and sequence in which tasks are executed within your workflow. It creates a clear path for the workflow to follow, ensuring tasks occur in the intended order.
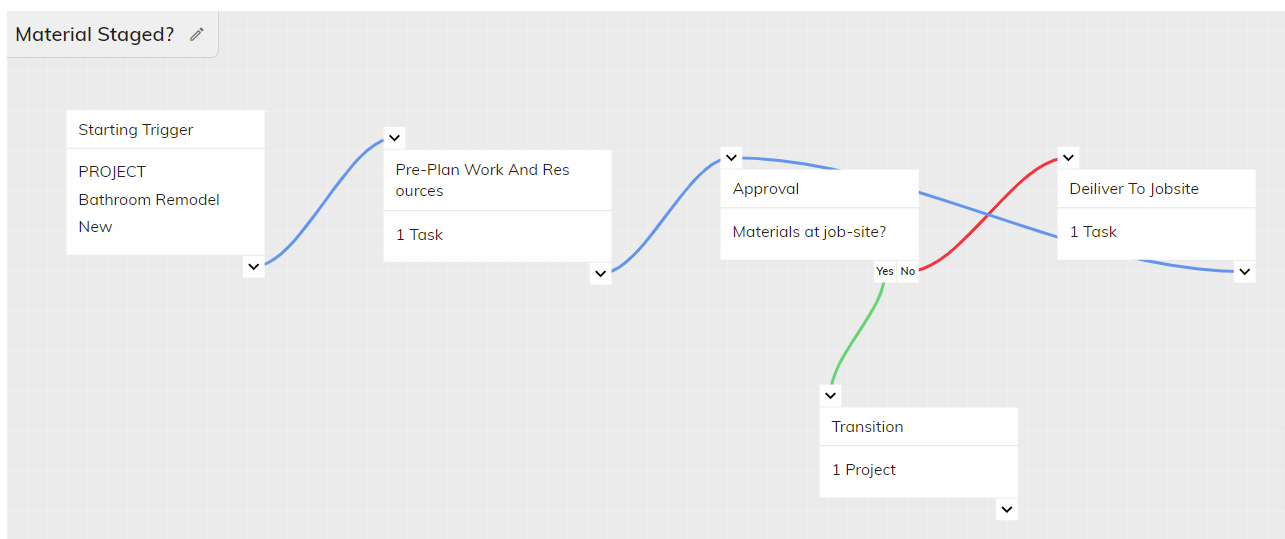
Locate the endpoint of the starting trigger indicated by a down arrow at the end of the trigger box. This endpoint signifies where the connection to the next step will be established.
Click on the endpoint of the starting trigger. While holding the mouse button, drag the cursor towards the next step you want to link.
The next step in your workflow will also have a starting point of the step you want to connect with. This might be a down arrow at the top-left of the step.
Once you've positioned the cursor over the starting point of the desired step, release the mouse button. This action should create a link between the starting trigger and the next step, indicating the blue line link is established.
Approval tasks typically have two distinct endpoints: Yes and No. These endpoints represent the two possible outcomes of the decision-making process within the approval task.
When the decision-maker selects Yes to approve, the workflow proceeds to the next step linked to the Yes endpoint. The green line visually indicates a successful approval leading to the next step.
If the decision-maker selects No to reject, the workflow diverts to the next step linked to the No endpoint. The red line often signifies a rejection, highlighting an alternative path within the workflow.
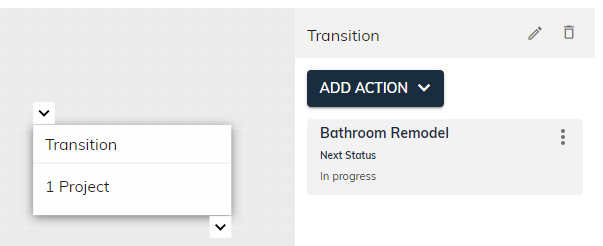
Update Status :
The Update Project action allows you to modify the current status of a project within your workflow. This action is typically included as a step within your workflow sequence.
When configuring the Update Project action, you'll need to specify the new status you want to assign to the project. This could be the next step in the pipeline sequence.
Click on the Update Project option will open a popup window to select the next status of your project within your workflow.
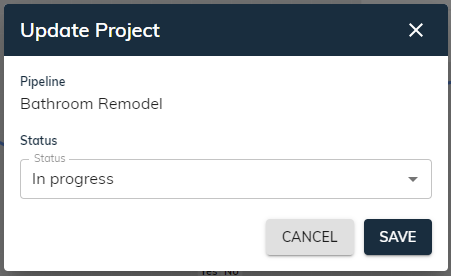
Pipeline: This is the title of the current pipeline you are configuring the workflow.
Status: You can interact with the dropdown list and choose the specific status you want to assign to the project. This allows you to manually move the project forward in the pipeline or potentially regress it to a previous stage if necessary.
Once you select a new status and potentially confirm the change by clicking on Save button, the project's status within the pipeline is updated accordingly. This triggers any automated actions associated with the chosen status.
On successful completion of the process, it looks like as following:
Activate :
Once you've meticulously built your workflow, adding steps, tasks, approvals, and potentially conditional logic, activation is the final step to bring it to life.
Once you're satisfied with your workflow design, look for an Activate button at top right corner within the workflow builder interface.
This might prompt you for confirmation before activation. This is a safeguard to ensure you're ready to launch the workflow.
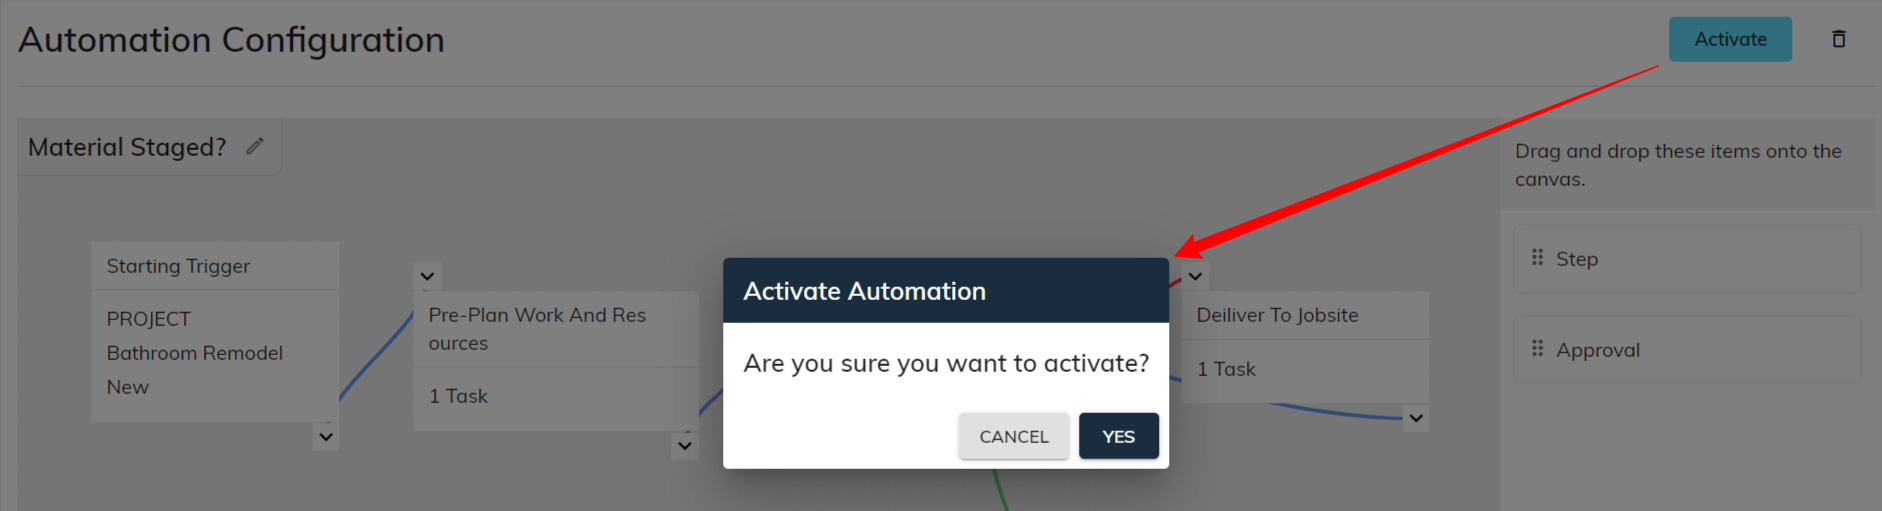
- Upon confirmation or clicking Activate, the workflow becomes active and transitions from a design state to an execution state.
- To view the automation details, click on the automation name. It will redirect you to the detail page.
- Once a workflow is activated and starts processing tasks or data, it switches to a read-only mode for that specific workflow instance. This prevents modifications to the workflow definition while it's actively executing.
Selecting a step will display the details of its tasks and approvals in read-only mode. You won’t have any action options like, edit or delete.
If you could modify the workflow steps or logic while it's running, it could lead to errors or unexpected behavior in the processing of ongoing tasks.
Edit Automation :
Locate the edit button at the top right corner to edit the selected workflow. Clicking Edit might trigger a confirmation prompt. This serves as a safeguard to ensure you intend to modify the workflow definition.
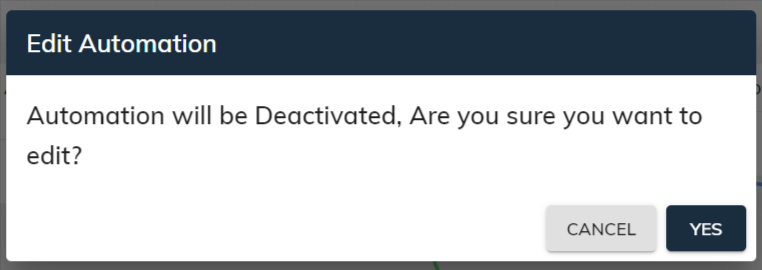
- Once you confirm the edit option, automation will be inactive.
Inactive automation exists within the system but is not currently functioning within your project workflows.
Editing automation will deactivate the workflow first and this would enable full editing and then reactivation with the changes.
Delete Automation :
Locate the delete button at the top right corner to delete the selected workflow. To prevent accidental deletion, it likely includes a confirmation step before permanently removing the workflow.

- Once you confirm the deletion, the workflow is permanently removed from the system.