Common List Features
Advanced Filters
Advanced filters are very powerful and impressive tools used to filter data based on complex requirements or criteria that can go beyond the capabilities of basic filtering options. It lets you define multiple criteria across different columns to pinpoint specific data sets. For instance, you can filter to find employees who have a “Designer”, “Administrator” or “Manager” roles.
To apply advanced filtering, click on the Filter icon shown below.

After clicking on the Filter icon, Right panel will open as shown below in the figure.
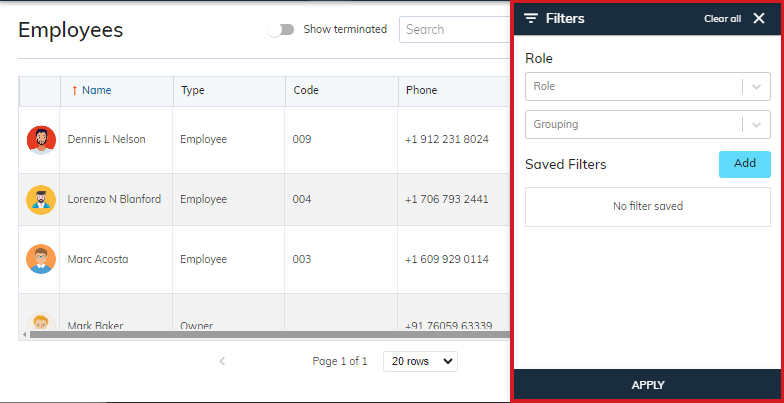

For applying filters:
- Click on the Role dropdown ▼ to quickly filter the employees with specific roles that you want to view.
- Select multiple roles as per your need. For instance, Administrator or Designer.
- Click on the Apply button.
For clearing (removing) filters:
- Click on the Clear all button, for removing all the filters that you have applied.
For closing Right panel:
- Once you’re finished, click the X in the top right of the panel.
Grouping
Grouping is an advanced feature to find records with identical properties among data. Grouping list items based on a chosen column, categorizing similar data for easier browsing.

- Click on the Grouping dropdown ▼ to quickly group the employees with specific roles that you want to view.
- Select Type from the dropdown.
- Click on the Apply button.
After applying grouping, the employee list displays in below format.

Click on the Row Expander to view employees of specific types.
(See in below figure)

Here, you can see that there are seven employees of type Employee and only one employee of type Owner.
Saved Filters:
Look for an option related to “Saved Filters” to save filters, so that you can revisit often when you need it; without selecting the criteria that you had specified before. Here, the criteria will get automatically applied, once you select a saved filter.
The ability to combine multiple criteria provides a high degree of flexibility in filtering data, saving your time and effort as compared to manual filtering.
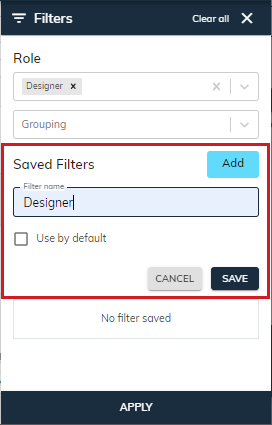
To create new filter:
- Select a specific criteria. For example, we have selected Designer in the Role dropdown ▼.
- Click on Add button, then enter a filter name that matches the criteria, then click Save. (When a user applies a filter, capture the chosen criteria and store them in the database.)
- Here, if there are no saved filters, then displays “No filter saved”.
Saving a default filter can be a very helpful feature for users, improving their experience in several ways:
- Users won’t need to manually reapply the same filter criteria every time they visit the page. Therefore, it increases the consistency, improves efficiency and also reduces the time spent on applying filters.
- Here, by seeing the filtered data by default, users can quickly get to the information they need without any additional steps. This can be beneficial for reviewing specific subsets of data regularly.
- The default filter automatically gets applied, whenever the user visits the page.If stored settings are found, the system pre-apply those filter criteria and fetch data accordingly before displaying it to the user.
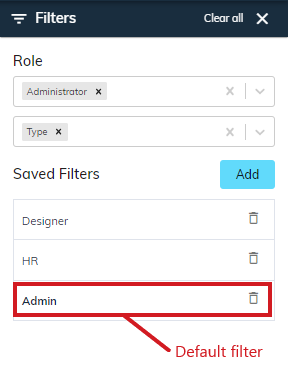
To save a default filter:
- Set your criteria (Select Role or group by type).
- Enter a specific filter name.
- Tick a checkbox, for using it default, then Save.

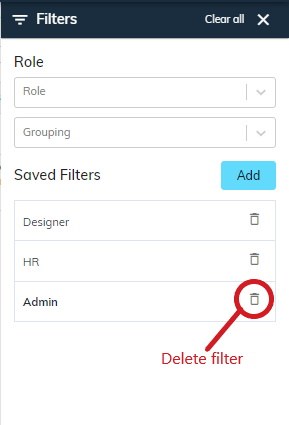
Once you save a default filter, you can see in the saved filters list as shown below.
To remove/delete a saved filter:
- To remove an existing filter, click on the delete icon.
- Open a confirmation delete modal.
sBizzl supports the best approach for deleting records from a list in a user-friendly manner. Confirming record before final deletion is suitable especially for users who might make mistakes. As it is a valuable addition to any deletion process.

Modal Window with Confirmation:
- When the user clicks the "Delete" icon from the saved filter list, a modal window appears in the center of the screen with a clear message:
"Are you sure you want to delete filter?" - The window offers two buttons: "Delete" and "Cancel".
- Clicking "Delete" removes the item from the list, while "Cancel" or “X” closes the modal window without deleting anything.
Column Management:
Column management in lists allows users to customize the information displayed, improve their efficiency, and focus on the most relevant data.
You can also access a complete list of columns and choose which ones to show or hide. These options might allow you to define which columns are visible in the default view of the employee list.

If you need to manage columns in your system, you can do so by clicking on the three vertical dots located near the column headers.
The most basic but powerful functionality of column management offers checkboxes for each column to show or hide.

Rearranging Columns:
Users can often change the order in which columns appear in the list. This is typically done by:
Drag-and-Drop: Clicking and holding a handler on the left side and then dragging it top or bottom to the desired position.
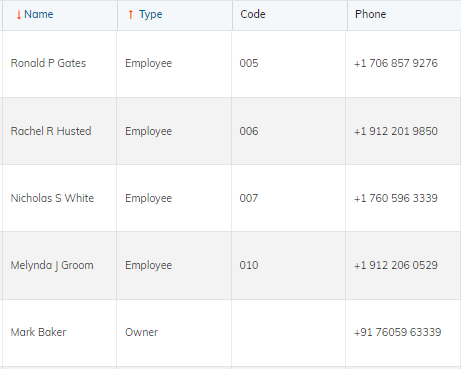
Sorting:
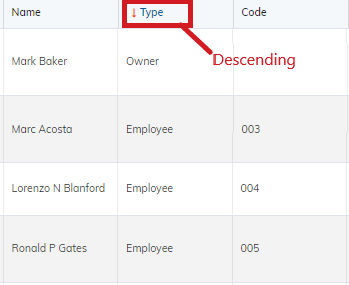
Sorting provides quick data organization, enhances data analysis and flexibility. It also allows users to arrange the list based on a chosen criteria with a single click, saving time compared to manual searching. The ability to sort by different columns empowers users to explore the data from various angles. Clicking on column headers allows sorting the list data based on the values in that column (ascending or descending order).
- The columns that are already sorted by default will have an arrow pointing up or down to indicate the current sorting order.
- Clicking the same column header again reverses the sorting order. The list becomes sorted in descending order (Z to A, largest to smallest, or latest to oldest). The arrow icon gets a flip direction to reflect the new sorting.

Sorting Multiple columns:
For applying sorting on multiple columns at a time, hold the "Shift" key while clicking on multiple column headers; automatically will get sorted by those columns sequentially.